Soil testing is a tool that guides
gardeners. Test results indicate the need to adjust soil pH and nutrient levels
for optimum plant growth.
What
Is a Soil Test?
A soil test is a measure of the soil's
ability to supply nutrients to growing plants. This analysis provides a guide
to the soil pH and nutrient levels. This helps gardeners determine the right
amount of lime and the type of fertilizer needed to grow the desired turf
grasses and crops.
Why
is soil pH So Important?
Soils change constantly. Erosion, leaching,
growing and harvesting crops affect the availability of soil nutrients. A soil
test indicates the current fertility and pH levels. If the soil pH level is too
high or too low, plants will not be able to effectively use fertilizer nutrients.
This means fertilizers are wasted when the proper soil pH is not maintained.
Many plants grow well over a wide range of
soil pH as long as other growing conditions are ideal. Some plants, however,
grow best within a narrow pH range. The soil pH test kit is an easy way to
determine if a soil is acidic, neutral or alkaline. The pH scale is much like
reading a thermometer with the range of alkaline and acidic materials divided
into 14 points. Some plants (rhododendrons, azaleas, blueberries) like to grow
in acidic soil with pH levels below 7.0. Most flowers, ornamental shrubs,
trees, vegetables and turf grasses grow best in slightly acidic soils with a pH
level between 6.1 and 6.9.
The availability of most soil nutrients is
greatest at a pH near 6.5. When pH rises above this level, trace elements such
as iron, manganese, copper and zinc become less available to plants. When the
pH level falls below 6.5, calcium and molybdenum become less available.
When
to Sample Soil?
Test your soil every 3 to 4 years unless
there is a particular problem or reason for a closer check on soil fertility.
Soil samples can be collected and tested any season when soil conditions allow.
There
are three soil components – Clay, Sand and Silt
Clay is the smallest mineral component.
These tiny flat particles fit closely together to have the greatest surface
area of all soil types. Clay soil contains needed nutrients and also stores
water well. So well in fact, that drainage is slow in clay soil. It is the
slowest to warm in the spring.
Sand makes up the largest particles in
soil. They are rounded, rather than flat. This allows for larger space between
the particles and water drains quickly.
Because of this, the nutrients drain faster than clay soil and your
plants will need more water and fertilizing.
Silt represents the middle size pieces. It
is made up of rock and mineral particles that are larger than clay but smaller
than sand. Individual silt particles are so small that they are difficult to
see. To be classified as silt, a particle must be less than .005 centimeters
(.002 inches) across.
The combination of these three particles is
called loam and is considered the ideal garden soil. Knowing how close (or far)
you are from loam will help you decided what amendments to make this spring
planting season.
How
to Test Soil Acidity/Alkalinity without a Test Kit - Do-It-Yourself Soil Test
i. The squeeze test
ii. The percolation test
iii. The worm test
iv.
The PH test
a.
The mason jar test
b.
Test the soil PH value with
vinegar and baking soda
c.
Cabbage water PH test
Soil Test #1: The Squeeze Test
One of the most basic characteristics of
soil is its composition. In general, soils are classified as clay soils, sandy
soils, or loamy soils. Clay is nutrient rich, but slow draining. Sand is quick
draining, but has trouble retaining nutrients and moisture. Loam is generally
considered to be ideal soil because it retains moisture and nutrients but
doesn’t stay soggy.
To determine your soil type, take a handful
of moist (but not wet) soil from your garden, and give it a firm squeeze. Then,
open your hand. One of three things will happen:
Soil, quick squeeze test
|
Here's a quick way to tell what kind of soil you have using the squeeze
1. It will hold its shape, and when you give it a light poke, it crumbles. This means luxurious loam!

2. It will hold its shape, and, when poked, sits stubbornly in your hand. This means you have clay soil.
3. It will fall apart as soon as you open your hand. This means you have sandy soil. |

Soil Test #2: The Percolation Test
It is also important to determine whether
you have drainage problems or not. Some plants, such as certain culinary herbs,
will eventually die if their roots stay too wet. To test your soil’s drainage:
Dig a hole about six inches wide and one foot deep.
Fill the hole with water and let it drain completely.
Fill it with water again.
Keep track of how long it takes for the water to drain.
If the water takes more than four hours to
drain, you have poor drainage.
Soil Test #3: The Worm Test
Worms are great indicators of the overall
health of your soil, especially in terms of biological activity. If you have
earthworms, chances are that you also have all of the beneficial microbes and
bacteria that make for healthy soil and strong plants. To do the worm test:
Be sure the soil has warmed to at least 55 degrees, and that it is at
least somewhat moist, but not soaking wet.
Dig a hole one foot across and one foot deep. Place the soil on a tarp
or piece of cardboard.
Sift through the soil with your hands as you place it back into the
hole, counting the earthworms as you go.
If you find at least ten worms, your soil
is in pretty good shape. Less than that indicates that there may not be enough
organic matter in your soil to support a healthy worm population, or that your
soil is too acidic or alkaline.
Soil Test #4: Ph Test
The Ph (acidity level) of your soil has a
large part to do with how well your plants grow. Ph is tested on a scale of
zero to fourteen, with zero being very acidic and fourteen being very alkaline.
Most plants grow best in soil with a fairly neutral Ph, between six and seven.
When the Ph level is lower than five or higher than eight, plants just won’t
grow as well as they should.
a. The
Mason jar test
Use a clear, clean, empty jar with a tight lid. A pint or quart Mason
jar works fabulously.

Fill the jar about half full of garden soil. You can use soil from
different areas of the garden to get an overall view, or make a test for each
garden bed.
Fill the jar nearly to the top with water. Leave room for shaking.
Tighten the lid and shake the jar for several minutes so that all the
particles are in suspension.
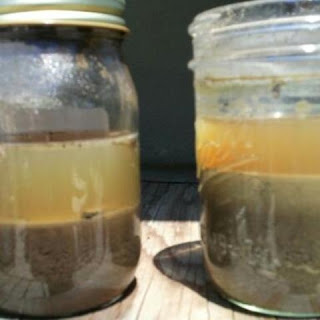
Set your mason jar soil test aside for several hours, so the particles
have a chance to settle. They will separate into clay, silt, and sand layers.
Read
the Results of your Mason Jar Soil Test
The bottom layer will be the heavier particles, sand and rocks.
The next layer will be the silt particles.
Above that are the clay particles.
Organic matter may be floating on the surface of the water.
The color of the soil gives a clue to its character – light colors
usually have less organic content than dark soils and dark soil warms faster in
the spring.
If your jar test is 20% clay, 40% Silt, 40%
sand = Loam, you have the perfect combination.
30% clay, 60% silt, 10% sand = Silty Clay
Loam
15% clay, 20% silt, 65% sand = Sandy Loam
15% clay, 65% silt, 20% sand = Silty Loam
These other types of soil will require some
amending with organic materials. Common amendments include:
• Yard trimmings compost
• Leaves from deciduous trees
• Crop residues
• Manures and manure composts
• Separated dairy / horse manure solids
b. Test
the soil PH value with vinegar and baking soda
You can test your garden soil pH with
vinegar and baking soda
Collect 1 cup of soil from different parts
of your garden and put 2 spoonfuls into separate containers. Add 1/2 cup of
vinegar to the soil. If it fizzes, you have alkaline soil, with a pH between 7
and 8.
If it doesn’t fizz after doing the vinegar
test, then add distilled water to the other container until 2 teaspoons of soil
is muddy. Add 1/2 cup baking soda. If it fizzes you have acidic soil, most
likely with a pH between 5 and 6.
If your soil doesn’t react at all it is neutral
with a pH of 7 and you are very lucky!

c. Cabbage
water PH test
You
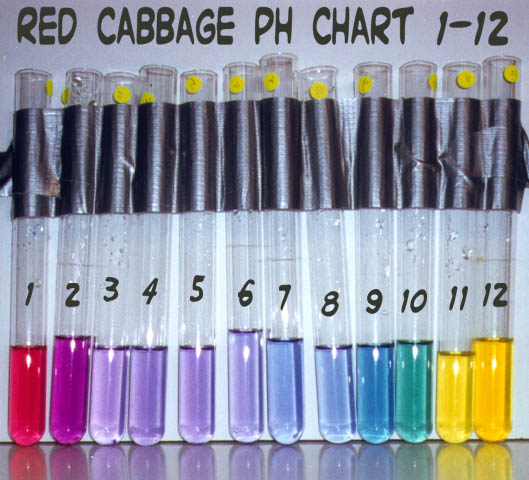
can make a cabbage water pH test
Measure 2 cups of distilled water into a
sauce pan. Cut up and add 1 cup of red cabbage. Simmer for 5 minutes. Remove
from heat and allow it to sit for up to 30 minutes.
Strain off the liquid – which will be
purple/blue. This will have a neutral pH of 7.
To test: add 2 teaspoons of soil to a jar
and a few inches of cabbage water. Stir and wait for 30 minutes. Check the
color. If it turns up pink, your soil is acidic. If it is blue/green, your soil is alkaline.
Amend your soil with wood ash or lime, if
it's acidic. Amend your soil with sulfur or pine needles, if it's alkaline.

And also check out our other
ABCD farming posts given below:
Looking forward for your queries and support for us.


