Wednesday, 23 December 2020
Saturday, 14 November 2020
Malabar spinach growing guide | Ceylon spinach | ABCD farming |
Guide to grow Malabar Spinach
Here, Let us discuss on procedure to grow Malabar spinach. Malabar spinach is also known as Indian or ceylon spinach. They are fast growing creepers, which are perennials in nature and they are native to Asia. Most of the people chew the raw leaves of these spinach variety. They are mainly used in salads. The stems of this vine is reddish purple in color. They can grow upto 10 feet height.

It is a fast Growing plant which has twining vine and grows up to 15 feet long. Malabar spinach is a Perennial and grows well in hotter climates. In cold climates, the malabar spinach creepers remains smaller in most of the gardens. The leaves texture is heart shaped.
The edible leaves (and shoots) of Basella alba resemble spinach with a mild, slightly peppery flavor with a hint of citrus and are used in the same way. The young leaves can be eaten raw mixed in a green salad, and steamed or boiled to be used like cooked spinach. Because of the mucilagenous nature, it can also be used to thicken soups and stews. Some people do not like the somewhat slimy texture of the cooked leaves (reminiscent of cooked okra) and others recommend adding a small amount of vinegar to the cooked leaves to make it more palatable. The leaves can be eaten throughout the season, but once plants start flowering, the leaves become bitter.
This warm season vegetable is very frost sensitive and should not be planted outdoors until a few weeks after all danger of frost has passed. Start seeds indoors 6 to 8 weeks before last frost. Seeds should germinate in 10 days to 3 weeks. Mechanical scarifi cation to open the tough seed coat (such as with a fi le, sharp knife or sandpaper) will hasten germination, as will soaking them in water overnight before planting. Transplant in the garden once the soil has warmed, placing plants at least a foot apart. Plants will not grow much until the heat of summer, and will not do much when night temperatures are consistently below 60F. This plant roots readily where the stems touch moist soil and is easily propagated from tip cuttings which root readily in water.
Malabar seeds
Seeds of Malabar spinach are small and dark purple in colour.

Wednesday, 11 November 2020
Sun flower cultivation in drylands | Dry Land Farming |
Sun flower crop is known to be the good consumable oil seed crop after seasame. It's parent country is Mexico. However, it is widely grown in India. Growing acreages of sunflower will not only provide oil but also helps in saving foreign exchange in big extent.


 sun flower seeds for sale
 seedling of sunflower seed
 after 20 days of sunflower plantation

There are many health benefits of sun flower oil. Studies says that it has 80% of vitamin E, thus it helps in various heart related diseases. Sunflower seeds are high in antioxidants so that they prevent Cancer and they boost thyroid function. It improves skin health, lowers blood pressure, etc...
Cultivation practices of sun flower
Sun flower crop is quick in maturing depending on the cultivars and growing season. Sun flower crop is resistant to high temperature, dry lands, low water irrigation etc.... It requires very less water and they are grown throughout the year.
Normally, sun flower crop matures between 78 to 90 days depending upon the varities. So choose early cultivars for farming. They are also grown as rainfed region.
Climate and soil
It is grown in almost all type of soils and throughout the year. Extremely lower temperature are not suitable in growing season. For seed formation it requires moderate climate.
How to sow sunflower seeds
Sunflower seeds are sown by dibbling and furrow method. It is said that by dibbling method it requires 2 to 3 kg of sunflower seeds per acre. After two weeks seedlings comes up. We need to thin them. The plant population of sun flower per acre should be between 20,000 to 25,000 plants.
Fertilizer
Farmyard manure two weeks before plantation is needed. After that good ploughing should be undertaken to mix the farm yard manure.
Pests
Sunflower beetle, Seed weevil (red), Banded Sunflower Moth, Cutworms, Seed weevil (gray), Sunflower moth (head moth), Sunflower stem weevil, Wireworms etc...
Diseases
Alternaria, Phoma black stem, Downy mildew, Sclerotinia, Sunflower rust etc...
Harvesting
The sun flower crop takes 90 days for harvesting. It may differ depending on cultivars.
Yeild
For one acre the expected yield is 7 to 9 quintals per acre.
Price
At an average the price per quintals of sunflower seeds is between 3500 to 4000 rupees. If the seeds are processed to oil, there is a chance for higher profits.
Tuesday, 10 November 2020
How to make Grape Wine at home | Red wine recipe | ABCD farming |
Red wine is one of the alcoholic beverage which is made by fermenting dark red coloured grapes. It is said to have high antioxidants.
Today, Let us see on how to make Red Grape wine at home.

Ingredients needed to make Red wine:
1. Red grapes 4 kg
2. Sugar 1.5 kg
3. Spices (cinnamon, cardomom, clove)
4. 10 gram yeast
5. Air tight glass jar
Steps to make Red Wine:
1. Pluck 4 kg of Red Grapes. Wash them with water.

2. Separate the grapes from cob.

3. Then squeeze all the grapes to a fluid form.

4. Then add that liquid juice to a glass jar.

5. Add 1.5 kg of sugar and then mix well.
6. After mixing well add spices (cardomom, cinnamon, clove etc..)

7. Add 200 gram of wheat.
8. Mix 10 gram of yeast to pure water. And add that mixture to glass jar. Mix well.
9. Take the lid to close the jar. The glass jar should be air tight. Kepp it separately for 21 days. Daily mix well.

10. After 21 days the Red wine will be ready.
Monday, 9 November 2020
Traditional coffee beans roaster | low cost coffee beans roaster | ABCD farming |
In the market there are many coffee beans roasters. Most of them are costly. The price starts from Rs.1,20,000 to Rs.8,00,000. But today I would like to share a video of a traditional drum roaster which can be made by yourself or with the help of nearby welder.

This video which found interesting and would like to share with you all.
You can watch the video here
https://m.youtube.com/watch?v=J1yupCgHjvc
how to make your own soap at home | Handmade soap | ABCD farming |
Basically soap Isa salt of the fatty acids. Domestically soaps are used in washing clothes, bathing, cleaning etc... Industrially soaps are used as thickeners, lubricants and catalysts etc..


At present, let us see how to make your soap at home for bathing.
Ingredients needed to make soap
1 cup of caustic soda
6.5 cup of coconut oil
2.5 cup of water
Caustic soda will be available in chemical industries or you can search in online store like Amazon.
Cococunt oil should be pure. Don't use coconut oil brands available in store. They add minerals to it. So buy from nearby mill.
Water can be used which is available at home.
Procedure
Firstly, Take a clean empty Plastic bucket. Add 1 cup of caustic soda. To that, add 2.5 cups of water and mix well.
Mix well upto 20 minutes after adding 6.5 cups of coconut oil. Mix well until the solution becomes fluid(like a pudding). And pour the solution in the moulds. If you don't have moulds you can use paper cups as moulds. You need to apply coconut oil inside the cup, so that the solution don't stick. After pouring the solution, keep them away from children. Let it dry on shade. After 24 hours remove the moulds and keep it shade. Don't use these soaps upto 30 days. Let the caustic soda properties drain.
After 30 days, you can use these soaps for bathing.
Wednesday, 4 November 2020
How to plant fruit trees
Trees play a major role in nature in various ways. Particularly fruit trees serves us nutrient fruits to consume... Here is a short brief description on how to plant fruit trres.
If you have enough water, fruit trees can be planted at any time of the year. If water is limited, it is best to plant when the soil is wet or at the start of the wet season.
Techniques for planting fruit trees:
1. Dig a hole knee deep, or more if possible. Fill the hole with water. Also water the tree when still in its container.
2. Put a pipe (which can be made from bamboo) inside the hole. Place some gravel below the pipe to help with water flow later on.
3. Fill a plastic bag with manure and place it at the bottom of the hole. If available, use a bag made of natural materials which will still hold the manure for a long time in the soil. Cover with soil and make a small mound in the hole for the tree to sit on.
4. Carefully, remove the tree from its container without breaking its roots. If there are many roots, gently loosen the bottom tree roots. Then, place the tree in the hole which has been prepared.
5. Fill the hole with soil. Make a shallow trench around the surface for water collection and to help with water supply. Make sure that the top of the tree roots are covered with at least 2 cm of soil to prevent the roots from drying out.
6. Add lots of mulch around the tree.
7. Water enough.
8. Make tree guards if needed.
Tuesday, 3 November 2020
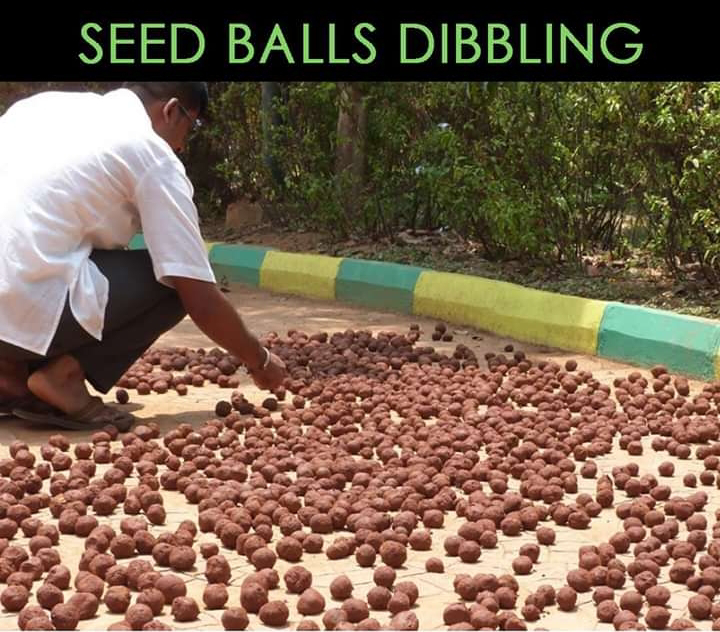
Seed balls for Afforestation an alternative way of sowing
Seed Balls
A seed ball is a small ball of clay, about 4 cm in diameter, containing plant seeds and dried manure. Seed balls are a good, simple technique to start reforestation in dry areas, steeply sloped areas, or areas with few or no plants or trees. Place the seed balls in any area you want before the wet season starts. The clay will protect the seeds inside from animals until the rains come. When the wet season starts the seeds will begin to grow and the dry manure will provide some nutrients to help them grow. It is best to use seeds of fast growing legumes, like acacia, leuceana and moringa. The trees that grow from the seed balls will improve the soil and provide protection and mulch for new trees planted afterwards.
Making Seed Balls
Choose clay that sticks together (doesn’t break) when rolled into a snake shape. Add some water to the clay so that it becomes easy to shape into a ball. Mix in a small amount of manure, but make sure that the clay will still stick together. First, make the balls, then add about 5-10 seeds in each ball. The seeds must be inside the ball so that animals won’t be able to eat them once they are in nature. Straight away, dry the balls in the sun for 1-2 hours. Leave until dry, but not cracked. Put them in a dry and shady place to continue drying. The balls must be completely dried because if they are still wet, the seeds will grow. When dry, store the balls in a dry place until you are ready to use them.
How to prepare your own weedicide at home
Today we will see how to make your own weedicide at home. Weedicide is used to kill the weeds. Weeds are main issue in farming, where the nutritions given to crop are absorbed by the weeds if weeds are present in the fields. Hence now let us see on how prepare weedicide at home.

The required materials to make weedicide at home are
1. 15 days old cow urine
2. Salt
3. Lemon or any citrus fruit
4. Soap
5. Power sprayer for spraying
The cow urine might be from native cow or HF cross cow. But it should be 15 days old.
* Firstly, cut 15 gram of soap and add it to the cow urine. Dissolve soap in cow urine.
* After adding leave the solution for 24 hours.
* After 24 hours, mix one handful of salt and 2 lemon juice in the above solution.
* Mix thoroughly. After mixing all of them, your weedicide is ready to use.
* Pour the solution in the power sprayer and spray to weeds.
After two or three days you will observe that the plants get dried.
Thursday, 29 October 2020
Broccoli cultivation guide
Broccoli is an important vegetable among the Cole crops. It is a rich source of vitamins and minerals. In fact, it contains more vitamin A than cabbage and cauliflower and the highest amount of proteins among the cole crops. It also contains anti-cancerous compounds and antioxidants.
Broccoli is of two types: heading type and
sprouting (green and purple) broccoli. Heading broccoli forms curd like cauliflower; while sprouting broccoli contains a group of green immature buds and thick fleshy flower stalk forming a head. Sprouting broccoli is more popular in India.
Variety
Green sprouting broccoli having green, firm and compact crown heads are more in demand in India. The important varieties are: KTS-I, Solan Green, Lucky, Fiesta, Pushpa, Aishwarya, PalamVichitra.
Soil and Climate
Broccoli can be grown in a wide variety of soils, but sandy and silt loam soils are most suited. It prefers well-drained upland soil for proper growth. The optimum pH range is 5.8-7.2.
It is a cool season crop and is sensitive to very low and high temperatures. The optimum temperature range of 10-25 "C is ideal for proper growth of the crop.
Field preparation
Same as in cauliflower
Seed rate
400-500g/ha
Sowing Time
In plain- Mid September to early November
In hills- September-October
Nursing Raising
Same as in cauliflower
Transplanting
The seedlings are ready for transplanting after 4-6 weeks of sowing. FYM @ 10-15 t/ha should be applied one month before transplanting. Nitrogen 120 kg, 80 kg phosphorus and 60 kg potash should be applied at the time of transplanting. Remaining half of nitrogen should be applied in two split doses at 30 and 45 days after transplanting. Transplanting should be done in the afternoon at a spacing of 45x30cm.

Irrigation
Light and frequent irrigation should be given at 10-15 days interval depending on
weather conditions.
Intercultural Operation
The crop should be kept weed free. Shallow hoeing should be done at 20-25 days after transplanting to remove weeds and loosen the soil for better aeration.
Plant protection measures
Cutworms: The caterpillars are 3 to 4 cm long, gray or brown to almost black with
various markings. They hide in daytime and feed at night. They cause damage by biting the foliage and by cutting down the young seedlings just above the ground level.
Control:
1. Picking and destruction of the larvae at the early stage of the crop.
2. Growing of paired rows of mustard after every 25 rows of the crop.
3. Spraying of the heavily infested crop with Rogoror Endosulfan@ 2 -3 ml/l of
water.
Leaf Webber: The leaves are skeletonised by the larvae, which remain on the under surface of leaves in webs and feed on them. They also attack flower buds and pods. The insect commonly sucks early grown crop.
Control:
1. Picking and destruction of the larvae at the early stage of the crop.
2. The crop should be sprayed with 3g solution.
Aphids: They feed on the plants affecting the quality. Mustard can act as a trap crop for aphids. Neemseed kernel extract can be sprayed at 4%.
Mustard saw fly: The larvae of mustard saw fly feed on leaves and it can be controlled by spraying.
Damping off: It is a serious disease in the nursery. In severe conditions, the affected
seedlings droop and fall off due to infection at the collar region. Seed treatment should be done at nusery.
Downy Mildew: This disease appears from nursery to curd formation stage. Fine Hair like downy growth of fungus is observed on the leaves. Corresponding to the downy fungal growth, minute pinhead brown necrotic spots appear on the upper surface of leaves. For controlling the disease, dense sowing of seeds in the nursery should be avoided.
White rust: It is a soil borne disease caused by fungus Sclerotiniascelorotiorum. The fungus attacks the bases of the outer leaves and plants suddenly wilt. For controlling this disease, the soil should be drenched with neem leaves extract with water. Deep ploughings should be done, as the fungus cannot survive below 15cm.
Black rot: First signs of the disease often appear along the margins of leaves as chlorotic regions and the chlorosis progresses in the direction of the mid rib forming a V-shaped area. Symptoms may appear from any side and centre of the leaves. The bacteria are transmitted through seeds.
Black leg: It occurs mostly in moist regions, especially in areas with high rainfall during the growth period. Proper seed treatment should be done.
Harvesting and yield
The crop is ready for harvesting after 80-90 days of transplanting. Heads having 10- 15 cm stems and green, compact bud clusters are harvested with a sharp knife. On an average, yield varies from 175-240 q/ha depending upon the variety.
Thursday, 22 October 2020
Easy Pest Repellers for your garden
Here I am posting some important for all to keep pests away from your gardens. Make your own and use
1. Neem
Ancient Indians highly revered neem oil as a powerful, all-natural plant for warding off pests. In fact, neem juice is the most powerful natural pesticide on the planet, holding over 50 natural insecticides. This extremely bitter tree leaf can be made in a spray form, or can be bought from a number of reputable companies.
To make your own neem oil spray, simply add 1/2 an ounce of high quality organic neem oil and ½ teaspoon of a mild organic liquid soap (I use Dr. Bronners Peppermint) to two quarts of warm water. Stir slowly. Add to a spray bottle and use immediately.
2. Salt Spray
For treating plants infested with spider mites, mix 2 tablespoons of Himalayan Crystal Salt into one gallon of warm water and spray on infected areas.
3. Mineral oil
Mix 10-30 ml of high-grade oil with one liter of water. Stir and add to spray bottle. This organic pesticide works well for dehydrating insects and their eggs.
4. Citrus Oil and/or Cayenne Pepper Mix
This is another great organic pesticide that works well on ants. Simply, mix 10 drops of citrus essential oil with one teaspoon cayenne pepper and 1 cup of warm water. Shake well and spray in the affected areas.
5. Soap, Orange Citrus Oil & Water
To make this natural pesticide, simply mix 3 tablespoons of liquid Organic Castile soap with 1 ounce of Orange oil to one gallon of water. Shake well. This is an especially effective treatment against slugs and can be sprayed directly on ants and roaches.
6. Eucalyptus oil
A great natural pesticide for flies, bees and wasps. Simply sprinkle a few drops of eucalyptus oil where the insects are found. They will all be gone before you know it.
7. Onion and Garlic Spray
Mince one organic clove of garlic and one medium sized organic onion. Add to a quart of water. Wait one hour and then add one teaspoon of cayenne pepper and one tablespoon of liquid soap to the mix. This organic spray will hold its potency for one week if stored in the refrigerator.
8. Chrysanthemum Flower Tea
These flowers hold a powerful plant chemical component called pyrethrum. This substance invades the nervous system of insects rendering them immobile. You can make your own spray by boiling 100 grams of dried flowers into 1 liter of water. Boil dried flowers in water for twenty minutes. Strain, cool and place in a spray bottle. Can be stored for up to two months. You can also add some organic neem oil to enhance the effectiveness.
9. Tobacco Spray
Just as tobacco is not good for humans, tobacco spray was once a commonly used pesticide for killing pests, caterpillars and aphids. To make, simply take one cup of organic tobacco (preferably a brand that is organic and all-natural) and mix it in one gallon of water. Allow the mixture to set overnight. After 24-hours, the mix should have a light brown color. If it is very dark, add more water. This mix can be used on most plants, with the exception of those in the solanaceous family (tomatoes, peppers, eggplants, etc.)
10. Chile pepper / Diatomaceous Earth
Grind two handfuls of dry chiles into a fine powder and mix with 1 cup of Diatomaceous earth. Add to 2 liters of water and let set overnight. Shake well before applying.
If you have some easy recipes for making your own organic pesticides, we would love to hear them.
Tuesday, 20 October 2020
Wednesday, 5 August 2020
Sorry for inconvenience
Edited: Thanks for your patience... We are back..!
Sorry for inconvenience. Will not be available online upto Oct 3rd 2020.
In the meantime you can view our previous posts.


Thursday, 30 July 2020
ABCD farming Farm update June 2020 and July 2020
Sorry guys, I would able to post the last Month farm update i.e June 2020.

Please refer the YouTube video. For farm update June 2020.

In June 2020, we harvested we harvested cow pea four times. In each harvest it yielded approximately 10 to 12 kgs of cow pea pods. The cow pea seeds were planted in four rows. The length of each row is 70 to 65 feet approximately. We have harvested the okra often, which was sown in between cow pea plants
A part of cow pea harvest are used for consumption. Few of them are dried to save seeds for adding to sambars in future, few of them are shared to nearby neighbours.
Turkey berry, Brinjal, curry leaves plants, bottle gourd, okra, pigeon pea, Tomato seedlings (sankarametta variety), Jasmine, Hibiscus, Gauva plants are all grown well.
The moringa stem cuttings are yet to sprout. The cucumber giant native variety, flowers bloomed and having small fruits. But they are getting spoiled due to the stagnant of water. Ridge gourd didn't grown well. I saved the seeds of ridge gourd from hybrid variety. Maybe that would be the reason regarding.
The chilly saplings which were transplanted near the cow pea plants have thrived well. Until now I didn't observed any diseases in these chilly plants.
The perrineal chilly is growing slowly, waiting patiently. I would not able to understand them.
When I observed pests in cow pea plants, I sprayed only fermented buttermilk solution mixed with water in the ratio 1:10 . After speaking, I observed little reduction in pests but not completely. Didn't applied any other manures.
You can view the video here
Farm update July 2020
In July 2020, I have cut down the cow pea plants and okra plants as the harvesting has completed. After cutting down the cow pea plants, I observed the chilly transplants which are planted near the cow pea have really thrived well under them.
The Bottle gourd plant which was planted at the last row has been spoiled. Don't know the reason. The chilly transplants are doing good.
Turkey berry (sundakkai) plant, pigeon pea, Tomato seedlings (sankametta variety), Jasmine, Hibiscus, Gauva are all growing well.
The cucumber giant native variety grown well but the fruit buds are falling down. I enquired with few people, they suggested to sow in summer season. In the moringa stem cuttings, still I didn't observed leaves... Yet to wait...!
In another plot, this time sown okra seeds (hybrid seeds). I Didn't have more native okra seeds for sowing. Okra grown upto one feet tall.
Sown few native varieties Beans Black seed, srilankan beans, snake gourd, Sittu parangikkai (பரங்கிக்காய்), cucumber Dharwad green variety, etc... Beans Black seed sprouts destroyed due to some leaf miners. Three sprouts survived. Only one sittu parangikai பரங்கிக்காய் out of five seeds has survived.
Tomato sankarametta variety seed which I sown, started to flower. I flower is different from other varities. The flower is large and oval spherical in shape.
You can see the flowering of tomato sankarametta variety in the video.
In perrineal Brinjal plants, I saw few pests. One of the pest which is in brown colour is making heavy damage to the stem of brinjal plants. These pests sit on the node of flowering bud of brinjal plant and they just eat them. I sprayed buttermilk solution mixed with water. The pests have reduced but not completely. The green and black color worms have considerably reduced. But these brown bugs are not reduced completely. You can see this brown bug in the video..you can give suggestions regarding..!
Finally, the video of ABCD farming farm update JULY 2020 will be updated soon. You can subscribe our YouTube channel for updates. #abcdfarming #farmupdate
Tuesday, 28 July 2020
Preparation of Panchagavya and how to use it as plant growth promotor

The most prominent plant growth promoter and support is Panchagavya or panchakavyam which literally means a 'concoction made of five products obtained from a cow'. The ingredients are Cow dung, Cow urine, Cow's milk, Curd and Ghee. These were mixed in correct combination and procedure and the mixture was fermented to get the wonder Elixir. This was a single solution for controlling the pests and boosting the plant growth and enhancing the yield, enriching the soil with useful minerals and useful microbes.
Preparation of Panchagavya:
We can now see how this is made:
The following items are required:
1. Fresh Cow dung - 1kg
2). Cow urine- 1.5 liter
3). Cow milk-1.5 liter
4). Cow curd- 250 Ml
5). Ghee – 250 gm
6). Ripe yellow bananas (Poovan) – 2 nos
7) Water - 1.5 liters
Procedure:
* Mix Cow dung and Ghee well and keep it covered in a wide mouthed plastic, cement or earthen container.( Avoid metal containers as this may react with metals.) Stir the contents thoroughly both in morning and evening and keep it covered with a fine mesh or cloth for 3 days. If not covered, the flies will lay eggs and we will have maggots in the preparation.
* After 3 days, mix cow urine and water and keep it covered for 15 days with regular mixing both in morning and evening.
* After 15 days add Cow's milk, Cow's curd and Bananas, mix well and keep it covered for another 15 days.
* Do regular stirring daily, both in morning and evening and keep covered.
Panchagavya will be ready to use by then.
Dosage and frequency of usage
10 Ml concentrate can be mixed in 1 liter water and filtered and used for foliar spray for plants from 4 leaf stage up to mature plants, once a week 20 –30 ml Ml in 1 ltr water (3% solution) can be used for soil drench. This concentrate can be stored upto 6 months.
Improvement on the formula:
This concoction had been modified and bettered by many experts and now they have incorporated a few more ingredients. So while adding Banana, the following two can also be added
Tender coconut water – 500 Ml
Jaggery - 3 kg ----- 500 gm
Balance is all the same. Some farmers add more items like sugar cane juice, fruit juices and toddy to introduce yeast for better fermentation. These inclusions will add to additional nutritional values for the preparation
Chemical composition
pH : 5.45
EC dSm2 : 10.22
Total N (ppm) : 229
Total P (ppm) : 209
Total K (ppm) : 232
Sodium : 90
Calcium : 25
IAA (ppm) : 8.5
GA (ppm : 3.5
Microbial Load
Fungi : 38800/ml
Bacteria : 1880000/ml
Lactobacillus : 2260000/ml
Total anaerobes: 10000/ml
Acid formers : 360/ml
Methanogen : 250/ml
Fatty acids Alkanes Alconol and Alcohols
Thursday, 16 July 2020
How to build geodesic domes using bamboo

The Geodesic domes are spherical in shape were lightweight triangular or polygonal facets consisting of either skeletal struts or flat planes, largely in tension, replace the arch principle and distribute stresses within the structure itself.
There are probably as many different dome designs as there are dome builders. This is partly because size, geometry, designs and coverings can be modified according to the raw materials available. The design shown here, though not as grand as the ones developed by experts, still uses the same basic geometric form. It is simple to build and easy to dismantle.
Depending on the type of covering you use, this design is suitable as a temporary or semi-permanent dwelling.
The essentials:
To build your own dome home you will need the following:
• Time : about a day (although it will only take about an hour to put up and less to take down).
• Equipment : drill and drill bits, tape measure, protractor, hand saw and a vice (not essential but will make construction more accurate, particularly when drilling the holes).
• Materials : hazel poles or broomsticks, about 20mm (¾") in diameter, 1.5m (5') of 130mm (5") alcathene gas pipe and 260 split pins. These make it easy to erect and take down your dome.
Preparation
Step 1. Cut 35 poles to exactly the same length: 1050mm-1200mm (3'6"-4') would give even tall people adequate headroom. Do not cut them shorter than 900mm (3') unless building for children; and 1200mm (4') is probably the optimum length for the strength of materials and joints used in this design.
Step 2. Saw 30 more poles, which must be 11% shorter than the long poles. For example, if you cut the long poles to 1200mm (4') then your shorter poles will be 1070mm (3'6").
Step 3. Cut the alcathene gas pipe into sections 50mm (2") long to make the joints. You will need 26 joints in all.
Now you need to drill holes in the joints to hold the ends of the poles. The holes will need to be fractionally larger than the poles you use. For example, if you use standard household broomsticks which are roughly 20mm (¾") thick, holes will be cut to just less than 25mm (1") in diameter. This will ensure enough 'give' in the joints to create the angles necessary in dome building. You must make precise measurements. Be consistent, regardless of the dimensions you decide upon.
Assembly
Step 1. Assembling a prototype:Take one 5-hole joint and slot in five of the smaller poles.
Put two 4-hole joints at the base of the pentagon and slot three 6-hole joints onto the upright poles.
Step 2. At this point, measure where the holes need to be drilled in the poles either side of the pipe. Depending on the thickness of the pipe, this will be about 25mm (1") from the end of each pole and again about 25mm (1") further along the pole.
Once you have marked the poles, dismantle the pentagon. Sort the poles into two piles – long and short. Drill two holes in each end of every pole. It is vital that each hole is drilled in exactly the same position on every pole.
Step 3. Reassemble the pentagon and fasten the joints by inserting the split pins. Build from the middle outwards following the pattern as shown in video.
You can view the video in this post. Geodesic dome home was built in Aranya eco village, Berikai, Tamilnadu.
Mango people an organization who helped in building Geodesic dome.
Video courtesy : #mangopeople #aranyaecovillage
You can learn how to build geodesic domes practically through Auroville Bamboo centre.. The courses are going on.. :)
You can also contact #mangopeople an NGO in faridabad.
#geodesicdomes #portableshelters, #bambooshelter
Thursday, 25 June 2020
About Farm Drone pesticide sprayers

In the present era, there are too many developments in precision agriculture for increasing the crop productivity. Especially, in the developing countries like India, over 70% of the rural people depends upon the agriculture fields. The agriculture fields faces dramatic losses due to the diseases. These diseases came from the pests and insets, which reduces the productivity of the crops. Pesticides and fertilizers are used to kill the insects and pests in order to enhance the crop quality. The WHO (World Health Organization estimated as one million cases of ill effected, when spraying the pesticides in the crop filed manually. The Unmanned aerial vehicle (UAV) – aircrafts are used to spray the pesticides to avoid the health problems of humans when they spray manually. UAVs or drones can be used easily, where the equipment and labors difficulty to operate. This paper reviews briefly the implementation of UAVs for crop monitoring and pesticide spraying.
A sprayer system is mounted on UAV for pesticides spraying. The integration of UAV with sprayer system results a potential to provide a platform to pest management and vector control. This is accurate site specific application for a large crop fields. For this purpose heavy lift UAVs or drone sprayers are required for large area of spraying. The efficiency of the spraying system which is mounted to the UAV or drone increases through the PWM controller in the pesticide applications. A petrol powered unmanned aerial vehicle Yamaha RMAX developed for pesticide spraying in rice fields of Asia. In comparison with ground based sprayers, deposition of pesticides from the developed UAV is almost similar. The RMAX is a crop sprayer for a high value crop environment. A prototype extendable to develop a drone with increasing volume mean diameter droplet size up to 300mm. The uses of drone in spraying operations are increasing because of its speed and accuracy. But, some factors reduce the crop quality like some area in the crop field is not covered properly while spraying, Crop areas overlapping and outer edges of the crop field in the spraying process. To overcome these factors, a swarm of Drones were used in a control loop of algorithm for agriculture operations, where unmanned aerial vehicles are the responsible for the spraying pesticides. The process of spraying the pesticides on the crop is organized by the feedback coming from the WSNs deployed in the field. The communication with each one is done by a control loop to adjust the route of unmanned aerial vehicle to changes in the speed of wind and number of messages exchanged in between. A short delay in the control loop, so that the unmanned aerial vehicle can analyze the data from WSN to further route. It could also minimize the waste of pesticides. An automatic navigation UAV spraying system MSP430 developed to direct the UAV in desired spray area.
Keeping in view of these facts, a crop monitoring and Pesticide spraying Drones are developed consisting of an automated drone system and sprinkling system with multi spectral camera. The sprinkling system is attached to the lower region off the UAV which has a nozzle beneath the pesticide tank to sprinkle the pesticide towards downstream. First monitoring is done by multi spectral camera, the camera scans the whole crop field and generates a spatial map. This map manifest the condition of the crop through NDVI and then the farmer evaluates which type of pesticides/fertilizers apply on the crop.
UAVs in precision agriculture is still in its early stage and maybe a scope for further development in both the technology and the agriculture applications. Providentially, it is expended that with the development of UAV'S technology, improved image processing techniques, lower costs, flying times, batteries, new camera designs, low volume sprayers, and nozzle types. A significant number of experimental studies of UAV'S based remote sensing for agriculture application. It will be a more prominent advantages of these systems in precision agriculture and environmental monitoring.
Conclusion: The drone sprayers are costly. The drone service centers are less in number. They are suitable for large scale land holders. Proper training is needed to run the drones.
#dronesprayers #farmdrones
Wednesday, 17 June 2020
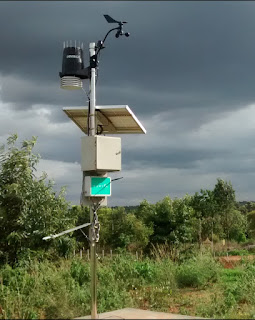
About setting up farm weather stations
Farm Weather stations will be helpful for open field plantations and is one of the
best-understood data capture requirements in agriculture. The micro weather data
comprises of temperature, humidity, pressure, rain, wind speed, wind direction,
solar radiation, evaporation, soil moisture, and temperature etc..
Temperature and humidity can be done with help of semiconductor sensors.
The way to measure rain is via gauges or tipping rain buckets. Wind speed and
direction sensors are analog sensors. The rate of evaporation can be monitored
using an evaporation PAN. A depth sensor can be used for automatic pan depth
measurements. For disease onset and prediction, four sensors, namely, Rain, Leaf
wetness, temperature, and humidity are critical. Leaf wetness sensors try to mimic
the presence of water on leaves using conductivity or capacitive measurements.
Temperature and humidity
are common across most of the
requirements. The plants require a
certain temperature and humidity range
to thrive. The fungi and pathogens
also thrive in certain environmental
conditions. Like, mildew worms in
grapes happen in certain leaf wetness,
temperature and rain conditions. open
field agriculture practitioners may also
need evaporation and solar radiation
data.
Rain and soil are also critical
variables. Soil needs to be monitored
at different depths. Water intensive
crops need soil moisture sensors to
check if the roots are getting water
or not. Soil nutrients like NPK need
to be monitored to check soil health.
Different soil can have different pH
and thus suitability for different crops.

The availability of the hyper local
weather data is critical to scope out
the farm level conditions. The data
captured from satellites are at a
much lower resolution and cannot
help answer farm level questions. A
grid of weather stations capturing
micro weather data can be deployed
to collect real-time data from the field
that can be used to analyzed weather
conditions and develop advisories.
Can build Arduino based weather stations on our own. Tutorials available online.
Or we can choose readymade farm weather station available in the markets. One such company is YuktIx technologies. You can contact them for more info.
YuktIx Technologies
www.yuktix.com
+91-9910908382Tuesday, 16 June 2020
Farm update video tour May 2020
We would like to show you our farm plot for food security. Choosen few annuals and perrineals for growing. There are nine rows, where five rows are for perrineals and four rows for annuals. The perrineals includes p Pigeon pea, Brinjal, Kandhari chilly, etc... The annual rows includes cow pea, okra or ladies finger, Local variety chilly, Bottle gourd, Beans (dwarf), Ridge gourd, etc... Included Hibiscus, Jasmine plants at the bunds to attract pests. The curry leaves plants were also planted in the bunds.
Kandhari chilly, a chilly variety which has self life of two years. At the beginning the fruits looks white, when ripening it turns to red. The spicy-ness of the Kandhari chilly is highest when compared to other varieties.
Pigeon pea has a self life of 2 years. The seeds can be dried and stored for future purpose.
Brinjal a perrineal native variety which lives for 2 years. A good tasty variety. The variety is not bitter.
Cow pea, the seeds can be saved. If pods are light green we can use while pod for cooking.
Okra or Ladies finger, starts to yield from 50th day and yield upto 90 th day.
Bottle gourd, a native variety which tastes good. A good combination for a sambar. Has self life of 6 months. Can harvest for 70 days. The first yield will start from 50th day.
Ridge gourd, same as bottle gourd, it also yields from 50th day. Has self life of 6 months.
Beans, we sown dwarf variety. The beans seeds are purple in colour. Thus they are commonly known as purple beans. Grows upto one to one and half feet height. Beans seeds can be saved for food.
Cucumber a awesome native variety which are mainly cultivated for it's seeds. It is believed that these seeds control ageing. The fruit juice made using this cucumber is awesome. Can't regret.
 |
Thursday, 11 June 2020
Thursday, 4 June 2020
How to grow poona kheera cucumber

Poona kheera cucumbers produce large fruits which are traditionally cut into slices for use in salads and as a garnish. They are a fast growing crop under good growing conditions. The maturity is between 55 to 65 days. Poona kheera cucumber is grown in spring and summer. Usually, cucumber plants can't withstand frost at all. So, plant in hot and warm conditions.
Cucumbers are native to the tropics and absolutely must have warm soil (70˚ F minimum) for good germination and growth. Consequently they are among the last crops to be planted out in spring. Most varieties fruit better in short days, so they tend to be more productive later in the summer. Cucumbers take 2 weeks to germinate at 60 degrees, but only 3 days at 85 degrees. Cucumbers can be grown in partial shade. I.e it needs atleast 6 hours of full sun light.
The best way to water Cucumbers is with a drip system or soaker hose, as this keeps the leaves dry and so reduces the chance of disease problems. If you must get the leaves wet, water in the morning, or early evening, so they have a chance to dry out quickly. You don't want the leaves to stay wet all night.
Be careful not to overwater germinating seeds or they may rot. It's best to soak the ground or the potting soil heavily when first planting, then avoid watering again if possible until seedlings emerge. Cucumber seeds emerge in 5+ days; very lightly water ground or potting soil around day 3 or 4 to keep soil from crusting so that seeds can emerge more easily.
Poona kheera Cucumbers grow quite well in containers and several varieties have been produced specifically for this. They will be more productive in larger containers (at least 12" in diameter). In order to prevent root rot, it is important that your container has drainage holes. Line the bottom of your container with weed cloth or newspaper and then cover with a handful of small rocks. Fill the remainder with amixture of peat moss, compost and potting soil. Cucumbers need a minimum of 6 hours of sunlight per day. In extremely hot climates, it is best to provide partial shade and keep your container away from direct sunlight. Cucumbers need lots of water, and they prefer moist soil.
Poona kheera cucumbers attracts beneficial insects. The fruit size of the cucumber is 6 inches to 11 inches. The fruits on maturing will turn to brown from green. So, harvest the fruits while it is still green.
Thursday, 28 May 2020
Small millet Food recipes for healthy life

Millets are nutri cereals comprising of sorghum, pearl millet, finger millet (major millets) foxtail, little, kodo, proso and barnyard millet (minor millets). These are one of the oldest foods known to humanity. These are one of the several speciesof coarse cereal grasses in the family Poaceae, cultivated for their small edible seeds. They are highly nutritious, non-glutinous and not acid forming foods. Hence they are soothing and easy to digest.
They contain high amounts of dietary fibre, B-complex vitamins, essential amino and fatty acids and vitamin E. They are particularly high in minerals, iron, magnesium, phosphorous, potassium and release lesser percentage of glucose over a longer period of time causing satiety which lowers the risk of diabetes.These grains are high in carbohydrates, with protein content varying from 6 to11 percent and fat varying from 1.5 to 5 percent. Millets are typically annuals and range in height from 30 to 130 cm with the exception of sorghum and pearl millet, which has stalks 1.5 to 3 m tall and about 2.5 cm thick. The inflorescences may be spikes or racemes, in which the flowers are borne on stalks of about equal length along an elongated axis, or panicles with dense clusters of small florets. With the exception of pearl millet, seeds remain enclosed in hulls after threshing. Hulled seeds are usually creamy white.
In India, millets has been a staple diet and a main source of income for farmers especially in the semi-arid regions. They are important food and fodder crop in the semi-arid tropics (SAT) of the world and grows in both kharif and rabi seasons.
You can download the list of small millet recipes from the link
#smallmilletrecipes
Monday, 25 May 2020
How to remove the hard husk from the small millets at home ?

This article is concentrated on how to remove the hard husk from the small Millets at home. The husk of the small Millets like foxtail millet, barnyard millet, kodo millet, little millet, porso millet are very hardy when compared to the finger millet and pearl millet.
After getting the grains from threshing the small millets, the hard husk has to be removed. There are few machineries which are little bit costlier to remove husk from the small Millets. But, there is a way to do it small scale in home. Yes, you can remove the husk of small Millets using mixie at home. Follow the below steps to remove the husk from the small Millets.
* Let's consider foxtail millet for processing. Take 1 kg of foxtail millet to remove husk.
* Moisten the grains with sufficient water and leave it for 15 minutes.
* Then, put the wet foxtail millet to the mixie. With 3 second time interval grind them until you see the husk separated.
* After seeing husk in the grains, put the grains in the winnow.
* By winnowing process the separated husk husk will be removed.
* Further winnowing is recommended to remove any other impurities of husk present in the grains.
* After that you can use the cleaned grains for cooking.
There is a video you can refer to know the process.
You can refer to the above video, the same process as been explained by YouTube user. Credits goes to them.
#smallmillet #milletprocessingathome #foxtailmilletprocessing
Sunday, 24 May 2020
How to grow and harvest foxtail millet

Here is an article on how to grow foxtail millet.
Common name: Kakun
Vernacular Names: Foxtail millet (English), Kangni (Hindi), Navane (Kannada), Thinai (Tamil), Kang (Gujarati) and Rala (Marathi).
Family: Gramineae
Introduction: Fox tail is also known as Italian millet, and German millet. It is generally grown as a rainfed crop in India. It has an erect leafy stem that grow 60-75 cm tall and bend quite a bit at maturity due to heavy weight of earhead. Foxtail grain contains 10% to 12% Protein, 4.7% fat, 60.6 % carbohydrates 2.29% to 2.7% Lysine and 0.59 (mg) Thiamin.
Climate and soil: Foxtail can be grown in tropics as well as temperate regions both under low and moderate rainfall. The crop can be grown even at an altitude of 2000 metres and 50-75 centimetre annual rainfall. Foxtail grows well on well-drained loamy soils. They will not tolerate water-logged soils or extreme drought.
Varieties:
Following are the important varieties of the crop:
Pant setaria-4, TNAU-43, HMT-100-1, SIA-326, PS-4, K-2, K-3 and Krishna devaraya.
Land Preparation: Kakun does not require much field preparation. Before the onset of monsoon the field should be ploughed once with mould board plough. With onset of monsoon the field should be harrowed or plough with local plough twice in northern India or with blade harrows in south India.
Sowing Time: Kharif- June to July
Rabi- September to October
Seed rate: 8-10 kg/ha (line sowing)
15 kg/ha (broadcasting)
Seed treatment: Seed treated with Ceresan @ 3 g/kg of seed.
Method of Sowing: Broadcasting and line sowing.
Spacing: Row to row 25-30 cm, plant to plant 8-10 cm and depth 2-3 cm.
Manures and fertilisers: The crop is usually manured with 5 to 10 t/ha FYM about a month before sowing. Generally fertilizer recommendations to get a good crop are 40 kg nitrogen, 20 kg P2O5 and 20 kg K2O per hectare. All the fertilizers should be applied as a basal dose at a time of sowing.
Water management: Kakun sown during Kharif season does not require any irrigation. However, if dry spell prevails for longer period, then first irrigation at 25-30 DAYS and second irrigation at 40-45 DAYS must be given to boost the yields.
Important weeds: Among grassy weeds, Echinochloa colonum, Enhinochloa crusgulli (sawan), Dactyloctenium aegypticum (makra), Elusine indica (kodo), Setaria glauca (banra), Cynodon dactylon (doob), Phragmites karka (narkul), Cyperus rotundus (motha), Sorghum halepanse (banchari) are common. The broad-leaved weeds are Celosia argentia (chilimil), Commelina benghalensis (kankoua), Phylanthus niruri (hulhul), Solanum nigrum (makoi) and Amaranthus viridis (chaulai).
Weed Control: Two to three weedings with hand hoe are sufficient to keep the weeds in control.Post-emergence application of 2, 4-D sodium salt (80%) @ 1.0 kg a.i./ha at 20-25 DAS. Isoproturon @ 1.0 kg a.i. /ha as pre-emergence spray is also effective in weeds control.
Diseases:
Downy mildew (Sclerospora graminicola): Diseased plants are dwarfed with excessive development of tillers. Lengthwise yellow- green streaks are seen on the leaves.
Control: Spray of 0.2% solution of Mancozeb 75 WP may help to control the disease and seed treatment is also helps in controlling the disease.
Kernel smut (Ustilago crameri) : The smut affected plants usually are stunted and the affected earheads convert into black masses.
Control: Seed treated with thiram or ceresan @ 2.5 g/kg of seed and soaking seeds in hot water at 55 oC for 7-12 minutes and the crop rotation is also helps in controlling the disease.
Insect-pests management:
Shoot fly: Apply Phorate @15 kg/ha (10% granules) in the soil at the time of field preparation or Carbofuran (Furadan) 3% granules @ 30 kg/ha in furrows or as broadcast before sowing.
Harvesting Time: The crop matures in 80-100 days. The crop is harvested when the earheads are dry, either by cutting the whole plant by sickle or the ears separately. The crop is usually harvested during Kharif season from September to October and Rabi season from January to February.
Yield: Grain-15-18 qtl/ha, Straw-20-40 qtl/ha.
Courtesy: DACFW
#foxtailmillet #cultivation #farming
Friday, 22 May 2020
How to grow and harvest barnyard millet


Barnyard millet is a grain crop of lesser importance. It is very drought resistant but is also capable of withstanding water logging conditions. It is generally grown as a rainfed crop. Kudiraivali grains are consumed just like rice. They are also used in making rice pudding (kheer). The digestibility of protein is 40 per cent. The grain is eaten mostly by the poor classes, but sometimes it is brewed the beer. It is also used as feed for cage birds. The straw makes good fodder for cattle. Its green fodder is very much relished by cattle.
Origin and History: There is a mention of barnyard millet in ancient literature of India. It has been cultivated in China for more than 2000 years. Some of the investigators think that barnyard millet probably originated somewhere in central Asia. It spread from central Asia to Europe and America.
Area and Distribution: Barnyard millet is grown in India, China, Japan, Malaysia and East Indies. In China and Japan it is said to be grown as a substitute crop when the rice crop fails. It is also to some extent in Africa and United States of America. In India it is grown in Madhya Pradesh, Uttar Pradesh, Tamil Nadu, Andhra Pradesh, Karnataka, Maharashtra and Bihar.
Botanical Description: It is an herbaceous annual which tillers sparsely. Plant grows up to a height of 60 to 120 centimetre. The roots are fibrous and shallow. Stem is slender. Leaves are flat, glabrous or slightly hairy without ligule. The inflorescence is a panicle with densely crowded unawned spikelets. Spikelets are densely packed in three to five rows. The spikelets are subsided by two glumes within which there are two florets. Colour of the glume varies from white to red. The caryopsis remains enclosed in the lemma and palea. Colour of the grain is generally yellow or white.
CROP MANAGEMENT
Climatic Requirements: Barnyard millet is a drought tolerant crop and hence is grown as a rainfed crop. It can be grown successfully under partially water logged conditions. It is grown from sea level to an altitude of 2000 metres on the Himalayan slopes. Warm and moderately humid climate is good for raising barnyard millet crop. It is a hardy crop and is able to withstand adverse conditions of weather better than other cereals.
Soil: Barnyard millet is generally cultivated in soils of marginal fertility. It can be grown in partially water logged soils such as low lands on the banks of rivers etc. But it thrives best on sandy loam to loam soil having sufficient amount of organic matter. Gravely and stony soils with poor fertility are not suitable for raising barnyard millet crop.
Field Preparation: Since it is cultivated in very light and marginal soils, the land is given only a limited preparatory cultivation. Two ploughings with local plough or harrowing followed by planking are sufficient to prepare the seedbed for barnyard millet.
Seed and Sowing: Barnyard millet can be sown in the first fortnight of July with the onset of monsoon rains. The seed is broadcast or drilled in furrows 3-4 centimetre deep at the rate of 8-10 kg per hectare. Transplanting is also done in some places in Maharashtra. It is always better to sow it in rows 25 centimetre apart. In flood affected areas, it is sown with the first showers of rain by broadcast method and harvested before the flood may come.
Manures and Fertilisers: Farm yard manure of compost at the rate of 5 to 10 tonnes per hectare should be added for boosting the yield. It can be supplemented with 40 kg nitrogen, 30 kg P2O5 and 50 kg K2O per hectare. All the fertilizer should be added in the soil at the time of sowing. If irrigation facilities are available, half of the nitrogen should be top dressed in standing crop after 25-30 days of sowing.
Water Management: Generally barnyard millet does not require any irrigation. However, if dry spell prevails for a long period, then one irrigation must be given at the time of panicle initiation stage. It is always better if excess water of heavy rains is drained out of the field.
Weed Control: The field should be kept weed free up to 25-30 days after sowing. Two weedings are sufficient to control the weeds in barnyard millet field. Weedings may be done with hand hoe or wheel hoe in line sown crop.
DISEASES
Downy Mildew: It is caused by a fungus. Sometimes it may cause severe damage to the crop plants. In the beginning the light yellow bands are seen on the leaves which in due course of time become white. Later on leaves start drying and in case of severe infection earheads become chaffy. Remove the infected plants and destroy them. Use seed from healthy plants only.
Smut: It is also caused by a fungus. The affected panicles are full of black masses instead of grains. This is a seed-borne disease and can be controlled by treating the seed with Agrosan G.N. or Ceresan at the rate of 2.5 g per kg of seed of hot water treatment (soaking seed in hot water at 550C for 7-12 minutes).
Rust: It is caused by a fungus. Black spots are seen in lines on leaves. It causes considerable reduction in grain yield. Spray of Dithane M-45 at the rate of 2 kg in 1000 litres of water per hectare may check the spread of this disease.
Insect Pests: Stem borer can be controlled by applying 15 kg Thimet granules per hectare.
Harvesting and Threshing: The crop should be harvested when it is ripe. It is cut from the ground level with the help of sickles and stacked in the field for about a week before threshing. Threshing is done by trampling under the feet of bullocks.
Yield: The average yield of grain is 400 to 600 kg per hectare and that of fodder or straw around 1200 kg per hectare. With improved package of practices it is possible to harvest 10-12 quintals of grain per hectare.
Courtesy : TNAU


