Monday 16 February 2015

Aerobic composting materials required and methods to make your own


Aerobic composting is a very unique method of converting the wastes into humus.

Materials required

The wastes can be categorised into two types,

1. Nitrogenous: The materials with high nitrogen content e.g. Green plant materials, kitchen wastes, dung and animal manures etc.

2. Carbonaceous: These are the more stable materials having high carbon content e.g. straw, dried leaves and crop residues after harvest, dried seaweed etc.

Size of the heap

The size of the heap should be 5 metres length, 2 metres width, and 1-1.5 metres height. The length can be extended based on the availability of materials. Such extended heaps are called windrows.
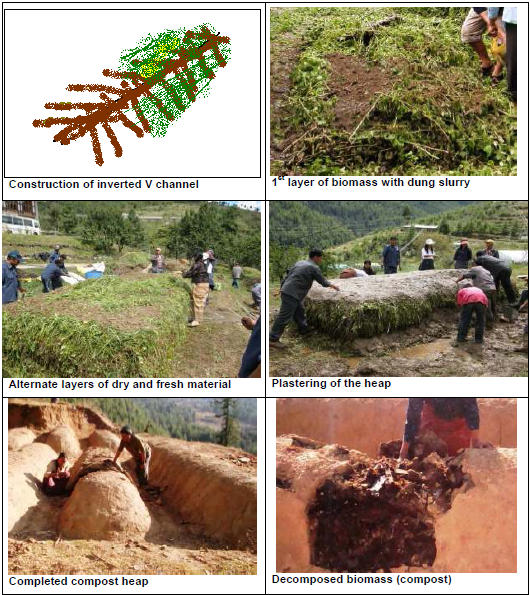

Method

1. Clean the area by removal of grass and other weeds with a spade.

2. Mark the area 5 m lengthwise and 2 m width.

3. An inverted ‘V’ channel is made with the help of dried stacks/ stones/bricks at the centre of the marked area running lengthwise. This tunnel will facilitate aeration.

4. Spread all the carbonaceous materials above the inverted ‘V’ shaped tunnel within the demarked area (5 m length x 2 m width) to a height of 15-30 cm.

5. Cow dung slurry or biogas slurry is spread over the carbonaceous layer in a very thin layer.

6. Over the slurry, the nitrogenous materials are evenly spread to a height of 15-30 cm

7. Again a layer of cow dung slurry or biogas slurry is spread over the nitrogenous layer.

8. Likewise a homogenous blend of carbonaceous and nitrogenous layers with dung slurry in between is made up to a height of 1.5 metres. On an average 40% carbonaceous and 60 % nitrogenous material are ideal.

9. The compost can be enriched with lime, rock phosphate or any such natural materials depending on the soil status.

10. The compost heap (5 m x 2 m x 1.5 m) is plastered with the slurry made out of equal proportions of cow dung and soil.

11. After 2 months turning the compost heap would enhance the composting process. However, there is no need to turn the heap. The compost would be ready in 2-3 months.


Heap composting how make your own, materials required and methods


The heap composting method is a very simple and is quite popular in Bhutan.

Materials Required

1. Green biomass – 1 ton

2. Dry Biomass – 1 ton

3. Cow dung – 200 kg

4. Water

Method

1. Demark an area 2 metres width and 3 metres length. Depending on the availability of the materials the length of the heap can be extended.

2. A layer of stones or wooden logs are placed within the demarked area as a basal layer which helps in providing aeration.

3. Dung slurry is prepared by mixing 25 kg of dung in 100 liters of water.

4. A layer of dry biomass is uniformly spread to the height of 30 cms and moistened with dung slurry.

5. On the top of the dry biomass layer, green biomass is spread and moistened with dung slurry.

6. Similarly, alternate layers of dry and green biomass are laid to the height of about 1-1.5 metres height. Each layer of biomass is thoroughly moistened with dung slurry.

7. Similarly, alternate layers of dry and green biomass are laid to the height ofabout 1-1.5 metres height. Each layer of biomass is thoroughly moistenedwith dung slurry.

8. When the heap has reached a desired height it is covered with soil or straw.

9. To prevent the loss of nutrients by volatilization, the heap is made in shade. In certain places wherein there is no natural shade, thatched roofs or shade nets are to be made available.

10. To hasten the process of composting the heap can be turned after a month.

11. Depending on the weather conditions the compost will be ready in 2-3 months. In warm weather the composting process is faster than in winter months.


What is composting, types of composting, uses of composting

Composting

Composting is method to convert the wastes into humus rich manure for
improving the fertility and productivity of soil. It’s very simple and apt for the
small holder farmers. During the process of composting the biodegradable
wastes like crop residues, weeds, leaf litter, animal wastes etc are
scientifically transformed into manure which is called as compost. The
compost is rich in beneficial soil microorganisms, provides the nutrition to the
crops and improves the structure and texture of the soil.


Benefits of composting

Compost provides many benefits as a soil amendment and source of organic
matter by improving soil biological, chemical, and physical characteristics viz.,


  1. Increases microbial activity
  2. Enhances plant disease suppression
  3. Increases soil fertility
  4. Increases cation exchange capacity
  5. Improves soil structure in clayey soils
  6. Improves water retention in sandy soils
  7. Reduces bioavailability of heavy metals
Types of composting
There are different methods of composting which are practiced across the
world, the simple and efficient methods are,
a) Heap method
b) Aerobic composting
c) Vermicomposting

Looking forwrd for your queries and support !!!


Conclusion of green manuring and benefits

Conclusion of green manuring

  1. Green manures are potentially an expensive way to build fertility in protected systems
  2. With rotation planning and market consideration this cost can be reduced
  3. More research is needed to measure tangible benefits.
  4. Other strategies may further improve viability. Eg. Under-sowing, mobile structures, making compost from field green manure cuttings.
Links to prepare your own Green manure


Winter N-Fix : third type of green manuring to maintain soil fertility

Winter N-Fix
  1. Sow as for Summer N-Fix but use 1002-14 disk for beans/small peas
  2. Using 20% annual rye helps as a row marker and to fill out the tares
  3. Hoe just before tares start to ‘wander’
  4. Can be undersown with phacelia late Feb, to add volume.
  5. Good option to follow and/or precede Toms, cuc, peppers etc.
 Tares / Vetch
  1. Excellent late or Winter sown
  2. The best option for N-fixing before Summer crops
  3. Deep rooting
  4. Dense foliage
 
after 4 weeks you can cut it down and use it as green manure.
 
Looking for your Support and Queries !!!!


Summer N-Fix : second type of green manure to maintain soil fertility

Summer N-FIx
  1. Sweet clover/crimson clover 50/50.
  2. Sown in 10” rows with earthway seeder radish/leek disc (= about 2g / m2 ).
  3. Use wheel hoe when clover is 3-4”.
  4. Flail mow and incorporate at 10 weeks, or cut to allow regrowth
  5. Can be undersown with Quick Mix when hoed to increase bulk
Sweet Clover
  1. Fast growing N-Fixer
  2. Relatively quick to germinate
  3. Extensive root system
  4. Rapidly nodulates when inoculant is used – advised!
  5. Tall growing, competative
Crimson Clover
  1. Fast growing N-Fixer
  2. Relatively quick to germinate
  3. Good amount of foliage
  4. Good short term N-fix potential
  5. Easy to destroy
  6. Will regrow from cut.
After 10 weeks cut down and use as the manure.
Thanks to karibasappa mg and nishar sahid for joining the ABCD farming
Looking for support and queries!!!!


Friday 6 February 2015

Quick Mix green manure : How to have your own green manure to maintain soil fertiity

There are three types of Green manuring depending on your needs, Namely
  1. Quick Mix – 2-3 month non-leguminous mix, fast growing, weed suppressive and reasonably drought tolerant.
  2. Summer N-Fix – 3-4 month, 2 clovers, requires weed control and inoculant, good potential for N and OM
  3. Winter N-Fix – 5-6 month, requires weed control, good before hungry summer crops.
Quick Mix
Buckwheat                    (4g/m2)
Ameranth                      (0.3g/m2)
Phacelia                        (1.2g/m2)
Sow anytime from April – Aug
Broadcast buckwheat separately.
Perhaps mix sand with small ameranth/phacelia seed to assist even sowing.
 
Can be incorporated from 6 weeks >
 
Buck wheat
  • Fast Growing
  • Shades out weeds
  • Attracts beneficial insects
  • Phosphate accumulator
  • Will germinate well in decomposing crop debris
  •  Slow to form viable seed
 
 
Green Amaranth

  • Fast growing
  • Drought resistant
  • Large woody plant if allowed to mature = possible N lock-up
  • Will not seed in long days
  • Buy as ‘grain’


Phacelia

  • Fast growing
  • Shades out weeds
  • Flowers attract beneficial insects
  • Soft tissue = rapid breakdown
  • Cut before seed set


After 4 weeks cut all the plants and spread out on the raised bed and fill with soil and leave it for few days to decompose. After decomposing you can plant your crops.
 
Summer-n-fix green manure cultivation is explained in the tommorrow's post
 
Looking forward for your support and queries!


Green Manure for soil fertility management and its benefits

Green manuring is a practice of ploughing or turning into soil undecomposed
green plant material for the purpose of improving physical structure as well as
the fertility of the soil. It increases the availability of plant nutrients that
contribute to the yield of the crop.
 
 
The microbial activities are enhanced as the fresh organic material acts as the nutrient source for the diverse soil flora and fauna. The structure of heavy, light and sandy soil is considerably improved
and unproductive lands can be converted into fertile ones by green manuring. In hilly areas, green manuring prevents soil erosion on sloppy lands by providing very good soil cover.
 
Green manure crops are quick growing legumes and grasses that are ploughed into the field, mulched on the top of soil and used as composting material. Amongst the green manure crops sunhemp and daincha are outstanding in biomass production. It is essential that there should be sufficient moisture in the soil when the green manure crops are ploughed into the soil to facilitate the microbial activity.
 
Benefits of Green Manuring :
  1. Green manures, in the case of legumes, fix nitrogen and contribute to farm nitrogen needs.
  2. It  protect and enhance the soil’s biological activity by providing nutrition for the soil organism.
  3. It aerates the soil, consequently improving the soil structure.
  4. Green manure crops cover the soil in between successive grain crops, thus protecting the soil against wind and water erosion.
  5. Green manure crops reduce soil compaction.
  6. Green manure crops provide a habitat for pollinators and other beneficial insects. 


Wednesday 4 February 2015

Liquid manure for Organic Pest management to control pest as well as weed management

 A variety of plants (weeds) which have pesticidal value can be used. Plants
which have strong disagreeable odour are ideal for making this preparation
 

Materials required
  1. Plants like Parthenium, Lantana, Vitex, Eupatorium, Artemesia, Stinging nettle etc., - 3 kg
  2. Cattle dung - 3 kg
  3. 20 litre capacity plastic bucket
  4. Water – 20 litres


Method

  1. Collect 3 kg of plants (leaves and tender parts) of plants which have pesticidal activity. Chop them into small pieces and put into 20 litre bucket.
  2. Add 3 kg of cattle dung into the barrel and fill it up with water.
  3. The barrel is stirred every day for 7 days and then stirred once a week for the next 3 weeks. The preparation will be ready in 30 days.
  4. The concentrated solution is diluted ten times in water and used as a foliar spray.
  5. These sprays are very efficient in managing a variety of pests.
Precautions  
  1. The liquid manure has to be diluted ten times before spraying on the crop otherwise it scorches the plant.
  2. The solution has to be sieved through a cloth or gunny bag before spraying to avoid blockage of nozzles.
  3. The efficacy of the solution is up to one month and has to be used within that period.


Tuesday 3 February 2015

Process of Mulching and Advantages of Mulching in Agriculture

Process of Mulching and Advantages of Mulching in Agriculture
 
Mulching is a method of covering the soil with a thin layer of biomass. For
mulching, leaves, bark, nut shells, weeds, grasses, wood chips, silage, paper,
pine and conifer needles, paddy or wheat straw, rice husk, coir dust, saw dust,
banana and sugarcane leaf trashes etc which are available in the region can
be used.
 
The benefits of mulching are to prevent the loss of water by evaporation and
transpiration, keep down weeds due to soil solarisation, dampen temperature
fluctuations, increase soil moisture storage and facilitate uniform distribution of
moisture in the soil horizon. It reduces the runoff and soil losses, prevents
crusting and soil compaction, and reduces blowing and beating action of water
and wind. Mulches modify the micro-climate, alter the environment of soil
microbes, enhance soil flora and fauna activity, modify soil moisture regimes
and properties associated with it and soil temperature in the root zone,
12 improve rooting environment and soil productivity. Water use efficiency can be
doubled with mulching, frequency and intensity of irrigation can be reduced
drastically.
 
For mulching one hectare area of any agricultural crop about 4-5 tons of the
biomass is required. In most of the agricultural crops, mulches should be
applied uniformly after the first weeding which generally occurs after 2-3
weeks of sowing/transplanting.

Mulching is also very useful in horticultural crops as it reduces the water
requirement by reducing the evapo-transpiration. In most of the perennial
crops like apple, pears, plums, mandarins, walnuts and fruit crops fallen
leaves of the same plant can be used as mulch.


Benefits of Mulching

  1. Acts as storehouse of nutrients.
  2. Improves soil structure.
  3. Enhances the soil exchange capacity.
  4. Increases the infiltration of water and prevents hard pan formation.
  5. Acts as a buffer during rapid changes in soil alkalinity, acidity and salinity.


And also check out our other  ABCD  farming  posts given below:

Looking forward for your queries and support for us.