Tuesday 20 October 2020
Wednesday 5 August 2020
Sorry for inconvenience
Edited: Thanks for your patience... We are back..!
Sorry for inconvenience. Will not be available online upto Oct 3rd 2020.
In the meantime you can view our previous posts.


Thursday 30 July 2020
ABCD farming Farm update June 2020 and July 2020
Sorry guys, I would able to post the last Month farm update i.e June 2020.

Please refer the YouTube video. For farm update June 2020.

In June 2020, we harvested we harvested cow pea four times. In each harvest it yielded approximately 10 to 12 kgs of cow pea pods. The cow pea seeds were planted in four rows. The length of each row is 70 to 65 feet approximately. We have harvested the okra often, which was sown in between cow pea plants
A part of cow pea harvest are used for consumption. Few of them are dried to save seeds for adding to sambars in future, few of them are shared to nearby neighbours.
Turkey berry, Brinjal, curry leaves plants, bottle gourd, okra, pigeon pea, Tomato seedlings (sankarametta variety), Jasmine, Hibiscus, Gauva plants are all grown well.
The moringa stem cuttings are yet to sprout. The cucumber giant native variety, flowers bloomed and having small fruits. But they are getting spoiled due to the stagnant of water. Ridge gourd didn't grown well. I saved the seeds of ridge gourd from hybrid variety. Maybe that would be the reason regarding.
The chilly saplings which were transplanted near the cow pea plants have thrived well. Until now I didn't observed any diseases in these chilly plants.
The perrineal chilly is growing slowly, waiting patiently. I would not able to understand them.
When I observed pests in cow pea plants, I sprayed only fermented buttermilk solution mixed with water in the ratio 1:10 . After speaking, I observed little reduction in pests but not completely. Didn't applied any other manures.
You can view the video here
Farm update July 2020
In July 2020, I have cut down the cow pea plants and okra plants as the harvesting has completed. After cutting down the cow pea plants, I observed the chilly transplants which are planted near the cow pea have really thrived well under them.
The Bottle gourd plant which was planted at the last row has been spoiled. Don't know the reason. The chilly transplants are doing good.
Turkey berry (sundakkai) plant, pigeon pea, Tomato seedlings (sankametta variety), Jasmine, Hibiscus, Gauva are all growing well.
The cucumber giant native variety grown well but the fruit buds are falling down. I enquired with few people, they suggested to sow in summer season. In the moringa stem cuttings, still I didn't observed leaves... Yet to wait...!
In another plot, this time sown okra seeds (hybrid seeds). I Didn't have more native okra seeds for sowing. Okra grown upto one feet tall.
Sown few native varieties Beans Black seed, srilankan beans, snake gourd, Sittu parangikkai (பரங்கிக்காய்), cucumber Dharwad green variety, etc... Beans Black seed sprouts destroyed due to some leaf miners. Three sprouts survived. Only one sittu parangikai பரங்கிக்காய் out of five seeds has survived.
Tomato sankarametta variety seed which I sown, started to flower. I flower is different from other varities. The flower is large and oval spherical in shape.
You can see the flowering of tomato sankarametta variety in the video.
In perrineal Brinjal plants, I saw few pests. One of the pest which is in brown colour is making heavy damage to the stem of brinjal plants. These pests sit on the node of flowering bud of brinjal plant and they just eat them. I sprayed buttermilk solution mixed with water. The pests have reduced but not completely. The green and black color worms have considerably reduced. But these brown bugs are not reduced completely. You can see this brown bug in the video..you can give suggestions regarding..!
Finally, the video of ABCD farming farm update JULY 2020 will be updated soon. You can subscribe our YouTube channel for updates. #abcdfarming #farmupdate
Tuesday 28 July 2020
Preparation of Panchagavya and how to use it as plant growth promotor

The most prominent plant growth promoter and support is Panchagavya or panchakavyam which literally means a 'concoction made of five products obtained from a cow'. The ingredients are Cow dung, Cow urine, Cow's milk, Curd and Ghee. These were mixed in correct combination and procedure and the mixture was fermented to get the wonder Elixir. This was a single solution for controlling the pests and boosting the plant growth and enhancing the yield, enriching the soil with useful minerals and useful microbes.
Preparation of Panchagavya:
We can now see how this is made:
The following items are required:
1. Fresh Cow dung - 1kg
2). Cow urine- 1.5 liter
3). Cow milk-1.5 liter
4). Cow curd- 250 Ml
5). Ghee – 250 gm
6). Ripe yellow bananas (Poovan) – 2 nos
7) Water - 1.5 liters
Procedure:
* Mix Cow dung and Ghee well and keep it covered in a wide mouthed plastic, cement or earthen container.( Avoid metal containers as this may react with metals.) Stir the contents thoroughly both in morning and evening and keep it covered with a fine mesh or cloth for 3 days. If not covered, the flies will lay eggs and we will have maggots in the preparation.
* After 3 days, mix cow urine and water and keep it covered for 15 days with regular mixing both in morning and evening.
* After 15 days add Cow's milk, Cow's curd and Bananas, mix well and keep it covered for another 15 days.
* Do regular stirring daily, both in morning and evening and keep covered.
Panchagavya will be ready to use by then.
Dosage and frequency of usage
10 Ml concentrate can be mixed in 1 liter water and filtered and used for foliar spray for plants from 4 leaf stage up to mature plants, once a week 20 –30 ml Ml in 1 ltr water (3% solution) can be used for soil drench. This concentrate can be stored upto 6 months.
Improvement on the formula:
This concoction had been modified and bettered by many experts and now they have incorporated a few more ingredients. So while adding Banana, the following two can also be added
Tender coconut water – 500 Ml
Jaggery - 3 kg ----- 500 gm
Balance is all the same. Some farmers add more items like sugar cane juice, fruit juices and toddy to introduce yeast for better fermentation. These inclusions will add to additional nutritional values for the preparation
Chemical composition
pH : 5.45
EC dSm2 : 10.22
Total N (ppm) : 229
Total P (ppm) : 209
Total K (ppm) : 232
Sodium : 90
Calcium : 25
IAA (ppm) : 8.5
GA (ppm : 3.5
Microbial Load
Fungi : 38800/ml
Bacteria : 1880000/ml
Lactobacillus : 2260000/ml
Total anaerobes: 10000/ml
Acid formers : 360/ml
Methanogen : 250/ml
Fatty acids Alkanes Alconol and Alcohols
Thursday 16 July 2020
How to build geodesic domes using bamboo

The Geodesic domes are spherical in shape were lightweight triangular or polygonal facets consisting of either skeletal struts or flat planes, largely in tension, replace the arch principle and distribute stresses within the structure itself.
There are probably as many different dome designs as there are dome builders. This is partly because size, geometry, designs and coverings can be modified according to the raw materials available. The design shown here, though not as grand as the ones developed by experts, still uses the same basic geometric form. It is simple to build and easy to dismantle.
Depending on the type of covering you use, this design is suitable as a temporary or semi-permanent dwelling.
The essentials:
To build your own dome home you will need the following:
• Time : about a day (although it will only take about an hour to put up and less to take down).
• Equipment : drill and drill bits, tape measure, protractor, hand saw and a vice (not essential but will make construction more accurate, particularly when drilling the holes).
• Materials : hazel poles or broomsticks, about 20mm (¾") in diameter, 1.5m (5') of 130mm (5") alcathene gas pipe and 260 split pins. These make it easy to erect and take down your dome.
Preparation
Step 1. Cut 35 poles to exactly the same length: 1050mm-1200mm (3'6"-4') would give even tall people adequate headroom. Do not cut them shorter than 900mm (3') unless building for children; and 1200mm (4') is probably the optimum length for the strength of materials and joints used in this design.
Step 2. Saw 30 more poles, which must be 11% shorter than the long poles. For example, if you cut the long poles to 1200mm (4') then your shorter poles will be 1070mm (3'6").
Step 3. Cut the alcathene gas pipe into sections 50mm (2") long to make the joints. You will need 26 joints in all.
Now you need to drill holes in the joints to hold the ends of the poles. The holes will need to be fractionally larger than the poles you use. For example, if you use standard household broomsticks which are roughly 20mm (¾") thick, holes will be cut to just less than 25mm (1") in diameter. This will ensure enough 'give' in the joints to create the angles necessary in dome building. You must make precise measurements. Be consistent, regardless of the dimensions you decide upon.
Assembly
Step 1. Assembling a prototype:Take one 5-hole joint and slot in five of the smaller poles.
Put two 4-hole joints at the base of the pentagon and slot three 6-hole joints onto the upright poles.
Step 2. At this point, measure where the holes need to be drilled in the poles either side of the pipe. Depending on the thickness of the pipe, this will be about 25mm (1") from the end of each pole and again about 25mm (1") further along the pole.
Once you have marked the poles, dismantle the pentagon. Sort the poles into two piles – long and short. Drill two holes in each end of every pole. It is vital that each hole is drilled in exactly the same position on every pole.
Step 3. Reassemble the pentagon and fasten the joints by inserting the split pins. Build from the middle outwards following the pattern as shown in video.
You can view the video in this post. Geodesic dome home was built in Aranya eco village, Berikai, Tamilnadu.
Mango people an organization who helped in building Geodesic dome.
Video courtesy : #mangopeople #aranyaecovillage
You can learn how to build geodesic domes practically through Auroville Bamboo centre.. The courses are going on.. :)
You can also contact #mangopeople an NGO in faridabad.
#geodesicdomes #portableshelters, #bambooshelter
Thursday 25 June 2020
About Farm Drone pesticide sprayers

In the present era, there are too many developments in precision agriculture for increasing the crop productivity. Especially, in the developing countries like India, over 70% of the rural people depends upon the agriculture fields. The agriculture fields faces dramatic losses due to the diseases. These diseases came from the pests and insets, which reduces the productivity of the crops. Pesticides and fertilizers are used to kill the insects and pests in order to enhance the crop quality. The WHO (World Health Organization estimated as one million cases of ill effected, when spraying the pesticides in the crop filed manually. The Unmanned aerial vehicle (UAV) – aircrafts are used to spray the pesticides to avoid the health problems of humans when they spray manually. UAVs or drones can be used easily, where the equipment and labors difficulty to operate. This paper reviews briefly the implementation of UAVs for crop monitoring and pesticide spraying.
A sprayer system is mounted on UAV for pesticides spraying. The integration of UAV with sprayer system results a potential to provide a platform to pest management and vector control. This is accurate site specific application for a large crop fields. For this purpose heavy lift UAVs or drone sprayers are required for large area of spraying. The efficiency of the spraying system which is mounted to the UAV or drone increases through the PWM controller in the pesticide applications. A petrol powered unmanned aerial vehicle Yamaha RMAX developed for pesticide spraying in rice fields of Asia. In comparison with ground based sprayers, deposition of pesticides from the developed UAV is almost similar. The RMAX is a crop sprayer for a high value crop environment. A prototype extendable to develop a drone with increasing volume mean diameter droplet size up to 300mm. The uses of drone in spraying operations are increasing because of its speed and accuracy. But, some factors reduce the crop quality like some area in the crop field is not covered properly while spraying, Crop areas overlapping and outer edges of the crop field in the spraying process. To overcome these factors, a swarm of Drones were used in a control loop of algorithm for agriculture operations, where unmanned aerial vehicles are the responsible for the spraying pesticides. The process of spraying the pesticides on the crop is organized by the feedback coming from the WSNs deployed in the field. The communication with each one is done by a control loop to adjust the route of unmanned aerial vehicle to changes in the speed of wind and number of messages exchanged in between. A short delay in the control loop, so that the unmanned aerial vehicle can analyze the data from WSN to further route. It could also minimize the waste of pesticides. An automatic navigation UAV spraying system MSP430 developed to direct the UAV in desired spray area.
Keeping in view of these facts, a crop monitoring and Pesticide spraying Drones are developed consisting of an automated drone system and sprinkling system with multi spectral camera. The sprinkling system is attached to the lower region off the UAV which has a nozzle beneath the pesticide tank to sprinkle the pesticide towards downstream. First monitoring is done by multi spectral camera, the camera scans the whole crop field and generates a spatial map. This map manifest the condition of the crop through NDVI and then the farmer evaluates which type of pesticides/fertilizers apply on the crop.
UAVs in precision agriculture is still in its early stage and maybe a scope for further development in both the technology and the agriculture applications. Providentially, it is expended that with the development of UAV'S technology, improved image processing techniques, lower costs, flying times, batteries, new camera designs, low volume sprayers, and nozzle types. A significant number of experimental studies of UAV'S based remote sensing for agriculture application. It will be a more prominent advantages of these systems in precision agriculture and environmental monitoring.
Conclusion: The drone sprayers are costly. The drone service centers are less in number. They are suitable for large scale land holders. Proper training is needed to run the drones.
#dronesprayers #farmdrones
Wednesday 17 June 2020
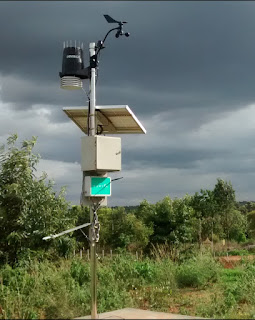
About setting up farm weather stations
Farm Weather stations will be helpful for open field plantations and is one of the
best-understood data capture requirements in agriculture. The micro weather data
comprises of temperature, humidity, pressure, rain, wind speed, wind direction,
solar radiation, evaporation, soil moisture, and temperature etc..
Temperature and humidity can be done with help of semiconductor sensors.
The way to measure rain is via gauges or tipping rain buckets. Wind speed and
direction sensors are analog sensors. The rate of evaporation can be monitored
using an evaporation PAN. A depth sensor can be used for automatic pan depth
measurements. For disease onset and prediction, four sensors, namely, Rain, Leaf
wetness, temperature, and humidity are critical. Leaf wetness sensors try to mimic
the presence of water on leaves using conductivity or capacitive measurements.
Temperature and humidity
are common across most of the
requirements. The plants require a
certain temperature and humidity range
to thrive. The fungi and pathogens
also thrive in certain environmental
conditions. Like, mildew worms in
grapes happen in certain leaf wetness,
temperature and rain conditions. open
field agriculture practitioners may also
need evaporation and solar radiation
data.
Rain and soil are also critical
variables. Soil needs to be monitored
at different depths. Water intensive
crops need soil moisture sensors to
check if the roots are getting water
or not. Soil nutrients like NPK need
to be monitored to check soil health.
Different soil can have different pH
and thus suitability for different crops.

The availability of the hyper local
weather data is critical to scope out
the farm level conditions. The data
captured from satellites are at a
much lower resolution and cannot
help answer farm level questions. A
grid of weather stations capturing
micro weather data can be deployed
to collect real-time data from the field
that can be used to analyzed weather
conditions and develop advisories.
Can build Arduino based weather stations on our own. Tutorials available online.
Or we can choose readymade farm weather station available in the markets. One such company is YuktIx technologies. You can contact them for more info.
YuktIx Technologies
www.yuktix.com
+91-9910908382Tuesday 16 June 2020
Farm update video tour May 2020
We would like to show you our farm plot for food security. Choosen few annuals and perrineals for growing. There are nine rows, where five rows are for perrineals and four rows for annuals. The perrineals includes p Pigeon pea, Brinjal, Kandhari chilly, etc... The annual rows includes cow pea, okra or ladies finger, Local variety chilly, Bottle gourd, Beans (dwarf), Ridge gourd, etc... Included Hibiscus, Jasmine plants at the bunds to attract pests. The curry leaves plants were also planted in the bunds.
Kandhari chilly, a chilly variety which has self life of two years. At the beginning the fruits looks white, when ripening it turns to red. The spicy-ness of the Kandhari chilly is highest when compared to other varieties.
Pigeon pea has a self life of 2 years. The seeds can be dried and stored for future purpose.
Brinjal a perrineal native variety which lives for 2 years. A good tasty variety. The variety is not bitter.
Cow pea, the seeds can be saved. If pods are light green we can use while pod for cooking.
Okra or Ladies finger, starts to yield from 50th day and yield upto 90 th day.
Bottle gourd, a native variety which tastes good. A good combination for a sambar. Has self life of 6 months. Can harvest for 70 days. The first yield will start from 50th day.
Ridge gourd, same as bottle gourd, it also yields from 50th day. Has self life of 6 months.
Beans, we sown dwarf variety. The beans seeds are purple in colour. Thus they are commonly known as purple beans. Grows upto one to one and half feet height. Beans seeds can be saved for food.
Cucumber a awesome native variety which are mainly cultivated for it's seeds. It is believed that these seeds control ageing. The fruit juice made using this cucumber is awesome. Can't regret.
 |
Thursday 11 June 2020
Thursday 4 June 2020
How to grow poona kheera cucumber

Poona kheera cucumbers produce large fruits which are traditionally cut into slices for use in salads and as a garnish. They are a fast growing crop under good growing conditions. The maturity is between 55 to 65 days. Poona kheera cucumber is grown in spring and summer. Usually, cucumber plants can't withstand frost at all. So, plant in hot and warm conditions.
Cucumbers are native to the tropics and absolutely must have warm soil (70˚ F minimum) for good germination and growth. Consequently they are among the last crops to be planted out in spring. Most varieties fruit better in short days, so they tend to be more productive later in the summer. Cucumbers take 2 weeks to germinate at 60 degrees, but only 3 days at 85 degrees. Cucumbers can be grown in partial shade. I.e it needs atleast 6 hours of full sun light.
The best way to water Cucumbers is with a drip system or soaker hose, as this keeps the leaves dry and so reduces the chance of disease problems. If you must get the leaves wet, water in the morning, or early evening, so they have a chance to dry out quickly. You don't want the leaves to stay wet all night.
Be careful not to overwater germinating seeds or they may rot. It's best to soak the ground or the potting soil heavily when first planting, then avoid watering again if possible until seedlings emerge. Cucumber seeds emerge in 5+ days; very lightly water ground or potting soil around day 3 or 4 to keep soil from crusting so that seeds can emerge more easily.
Poona kheera Cucumbers grow quite well in containers and several varieties have been produced specifically for this. They will be more productive in larger containers (at least 12" in diameter). In order to prevent root rot, it is important that your container has drainage holes. Line the bottom of your container with weed cloth or newspaper and then cover with a handful of small rocks. Fill the remainder with amixture of peat moss, compost and potting soil. Cucumbers need a minimum of 6 hours of sunlight per day. In extremely hot climates, it is best to provide partial shade and keep your container away from direct sunlight. Cucumbers need lots of water, and they prefer moist soil.
Poona kheera cucumbers attracts beneficial insects. The fruit size of the cucumber is 6 inches to 11 inches. The fruits on maturing will turn to brown from green. So, harvest the fruits while it is still green.


