Wednesday 23 December 2020
Saturday 14 November 2020
Malabar spinach growing guide | Ceylon spinach | ABCD farming |
Guide to grow Malabar Spinach
Here, Let us discuss on procedure to grow Malabar spinach. Malabar spinach is also known as Indian or ceylon spinach. They are fast growing creepers, which are perennials in nature and they are native to Asia. Most of the people chew the raw leaves of these spinach variety. They are mainly used in salads. The stems of this vine is reddish purple in color. They can grow upto 10 feet height.

It is a fast Growing plant which has twining vine and grows up to 15 feet long. Malabar spinach is a Perennial and grows well in hotter climates. In cold climates, the malabar spinach creepers remains smaller in most of the gardens. The leaves texture is heart shaped.
The edible leaves (and shoots) of Basella alba resemble spinach with a mild, slightly peppery flavor with a hint of citrus and are used in the same way. The young leaves can be eaten raw mixed in a green salad, and steamed or boiled to be used like cooked spinach. Because of the mucilagenous nature, it can also be used to thicken soups and stews. Some people do not like the somewhat slimy texture of the cooked leaves (reminiscent of cooked okra) and others recommend adding a small amount of vinegar to the cooked leaves to make it more palatable. The leaves can be eaten throughout the season, but once plants start flowering, the leaves become bitter.
This warm season vegetable is very frost sensitive and should not be planted outdoors until a few weeks after all danger of frost has passed. Start seeds indoors 6 to 8 weeks before last frost. Seeds should germinate in 10 days to 3 weeks. Mechanical scarifi cation to open the tough seed coat (such as with a fi le, sharp knife or sandpaper) will hasten germination, as will soaking them in water overnight before planting. Transplant in the garden once the soil has warmed, placing plants at least a foot apart. Plants will not grow much until the heat of summer, and will not do much when night temperatures are consistently below 60F. This plant roots readily where the stems touch moist soil and is easily propagated from tip cuttings which root readily in water.
Malabar seeds
Seeds of Malabar spinach are small and dark purple in colour.

Wednesday 11 November 2020
Sun flower cultivation in drylands | Dry Land Farming |
Sun flower crop is known to be the good consumable oil seed crop after seasame. It's parent country is Mexico. However, it is widely grown in India. Growing acreages of sunflower will not only provide oil but also helps in saving foreign exchange in big extent.


 sun flower seeds for sale
 seedling of sunflower seed
 after 20 days of sunflower plantation

There are many health benefits of sun flower oil. Studies says that it has 80% of vitamin E, thus it helps in various heart related diseases. Sunflower seeds are high in antioxidants so that they prevent Cancer and they boost thyroid function. It improves skin health, lowers blood pressure, etc...
Cultivation practices of sun flower
Sun flower crop is quick in maturing depending on the cultivars and growing season. Sun flower crop is resistant to high temperature, dry lands, low water irrigation etc.... It requires very less water and they are grown throughout the year.
Normally, sun flower crop matures between 78 to 90 days depending upon the varities. So choose early cultivars for farming. They are also grown as rainfed region.
Climate and soil
It is grown in almost all type of soils and throughout the year. Extremely lower temperature are not suitable in growing season. For seed formation it requires moderate climate.
How to sow sunflower seeds
Sunflower seeds are sown by dibbling and furrow method. It is said that by dibbling method it requires 2 to 3 kg of sunflower seeds per acre. After two weeks seedlings comes up. We need to thin them. The plant population of sun flower per acre should be between 20,000 to 25,000 plants.
Fertilizer
Farmyard manure two weeks before plantation is needed. After that good ploughing should be undertaken to mix the farm yard manure.
Pests
Sunflower beetle, Seed weevil (red), Banded Sunflower Moth, Cutworms, Seed weevil (gray), Sunflower moth (head moth), Sunflower stem weevil, Wireworms etc...
Diseases
Alternaria, Phoma black stem, Downy mildew, Sclerotinia, Sunflower rust etc...
Harvesting
The sun flower crop takes 90 days for harvesting. It may differ depending on cultivars.
Yeild
For one acre the expected yield is 7 to 9 quintals per acre.
Price
At an average the price per quintals of sunflower seeds is between 3500 to 4000 rupees. If the seeds are processed to oil, there is a chance for higher profits.
Tuesday 10 November 2020
How to make Grape Wine at home | Red wine recipe | ABCD farming |
Red wine is one of the alcoholic beverage which is made by fermenting dark red coloured grapes. It is said to have high antioxidants.
Today, Let us see on how to make Red Grape wine at home.

Ingredients needed to make Red wine:
1. Red grapes 4 kg
2. Sugar 1.5 kg
3. Spices (cinnamon, cardomom, clove)
4. 10 gram yeast
5. Air tight glass jar
Steps to make Red Wine:
1. Pluck 4 kg of Red Grapes. Wash them with water.

2. Separate the grapes from cob.

3. Then squeeze all the grapes to a fluid form.

4. Then add that liquid juice to a glass jar.

5. Add 1.5 kg of sugar and then mix well.
6. After mixing well add spices (cardomom, cinnamon, clove etc..)

7. Add 200 gram of wheat.
8. Mix 10 gram of yeast to pure water. And add that mixture to glass jar. Mix well.
9. Take the lid to close the jar. The glass jar should be air tight. Kepp it separately for 21 days. Daily mix well.

10. After 21 days the Red wine will be ready.
Monday 9 November 2020
Traditional coffee beans roaster | low cost coffee beans roaster | ABCD farming |
In the market there are many coffee beans roasters. Most of them are costly. The price starts from Rs.1,20,000 to Rs.8,00,000. But today I would like to share a video of a traditional drum roaster which can be made by yourself or with the help of nearby welder.

This video which found interesting and would like to share with you all.
You can watch the video here
https://m.youtube.com/watch?v=J1yupCgHjvc
how to make your own soap at home | Handmade soap | ABCD farming |
Basically soap Isa salt of the fatty acids. Domestically soaps are used in washing clothes, bathing, cleaning etc... Industrially soaps are used as thickeners, lubricants and catalysts etc..


At present, let us see how to make your soap at home for bathing.
Ingredients needed to make soap
1 cup of caustic soda
6.5 cup of coconut oil
2.5 cup of water
Caustic soda will be available in chemical industries or you can search in online store like Amazon.
Cococunt oil should be pure. Don't use coconut oil brands available in store. They add minerals to it. So buy from nearby mill.
Water can be used which is available at home.
Procedure
Firstly, Take a clean empty Plastic bucket. Add 1 cup of caustic soda. To that, add 2.5 cups of water and mix well.
Mix well upto 20 minutes after adding 6.5 cups of coconut oil. Mix well until the solution becomes fluid(like a pudding). And pour the solution in the moulds. If you don't have moulds you can use paper cups as moulds. You need to apply coconut oil inside the cup, so that the solution don't stick. After pouring the solution, keep them away from children. Let it dry on shade. After 24 hours remove the moulds and keep it shade. Don't use these soaps upto 30 days. Let the caustic soda properties drain.
After 30 days, you can use these soaps for bathing.
Wednesday 4 November 2020
How to plant fruit trees
Trees play a major role in nature in various ways. Particularly fruit trees serves us nutrient fruits to consume... Here is a short brief description on how to plant fruit trres.
If you have enough water, fruit trees can be planted at any time of the year. If water is limited, it is best to plant when the soil is wet or at the start of the wet season.
Techniques for planting fruit trees:
1. Dig a hole knee deep, or more if possible. Fill the hole with water. Also water the tree when still in its container.
2. Put a pipe (which can be made from bamboo) inside the hole. Place some gravel below the pipe to help with water flow later on.
3. Fill a plastic bag with manure and place it at the bottom of the hole. If available, use a bag made of natural materials which will still hold the manure for a long time in the soil. Cover with soil and make a small mound in the hole for the tree to sit on.
4. Carefully, remove the tree from its container without breaking its roots. If there are many roots, gently loosen the bottom tree roots. Then, place the tree in the hole which has been prepared.
5. Fill the hole with soil. Make a shallow trench around the surface for water collection and to help with water supply. Make sure that the top of the tree roots are covered with at least 2 cm of soil to prevent the roots from drying out.
6. Add lots of mulch around the tree.
7. Water enough.
8. Make tree guards if needed.
Tuesday 3 November 2020
Seed balls for Afforestation an alternative way of sowing
Seed Balls
A seed ball is a small ball of clay, about 4 cm in diameter, containing plant seeds and dried manure. Seed balls are a good, simple technique to start reforestation in dry areas, steeply sloped areas, or areas with few or no plants or trees. Place the seed balls in any area you want before the wet season starts. The clay will protect the seeds inside from animals until the rains come. When the wet season starts the seeds will begin to grow and the dry manure will provide some nutrients to help them grow. It is best to use seeds of fast growing legumes, like acacia, leuceana and moringa. The trees that grow from the seed balls will improve the soil and provide protection and mulch for new trees planted afterwards.
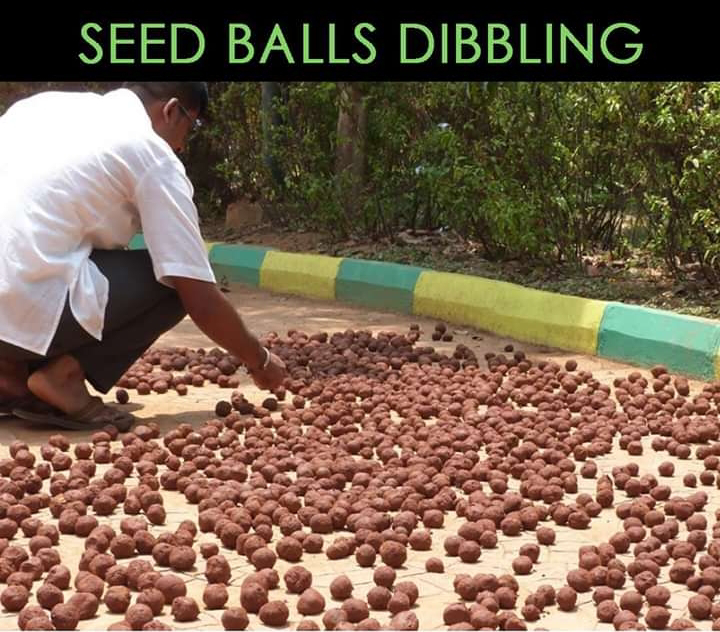
Making Seed Balls
Choose clay that sticks together (doesn’t break) when rolled into a snake shape. Add some water to the clay so that it becomes easy to shape into a ball. Mix in a small amount of manure, but make sure that the clay will still stick together. First, make the balls, then add about 5-10 seeds in each ball. The seeds must be inside the ball so that animals won’t be able to eat them once they are in nature. Straight away, dry the balls in the sun for 1-2 hours. Leave until dry, but not cracked. Put them in a dry and shady place to continue drying. The balls must be completely dried because if they are still wet, the seeds will grow. When dry, store the balls in a dry place until you are ready to use them.
How to prepare your own weedicide at home
Today we will see how to make your own weedicide at home. Weedicide is used to kill the weeds. Weeds are main issue in farming, where the nutritions given to crop are absorbed by the weeds if weeds are present in the fields. Hence now let us see on how prepare weedicide at home.

The required materials to make weedicide at home are
1. 15 days old cow urine
2. Salt
3. Lemon or any citrus fruit
4. Soap
5. Power sprayer for spraying
The cow urine might be from native cow or HF cross cow. But it should be 15 days old.
* Firstly, cut 15 gram of soap and add it to the cow urine. Dissolve soap in cow urine.
* After adding leave the solution for 24 hours.
* After 24 hours, mix one handful of salt and 2 lemon juice in the above solution.
* Mix thoroughly. After mixing all of them, your weedicide is ready to use.
* Pour the solution in the power sprayer and spray to weeds.
After two or three days you will observe that the plants get dried.
Thursday 29 October 2020
Broccoli cultivation guide
Broccoli is an important vegetable among the Cole crops. It is a rich source of vitamins and minerals. In fact, it contains more vitamin A than cabbage and cauliflower and the highest amount of proteins among the cole crops. It also contains anti-cancerous compounds and antioxidants.
Broccoli is of two types: heading type and
sprouting (green and purple) broccoli. Heading broccoli forms curd like cauliflower; while sprouting broccoli contains a group of green immature buds and thick fleshy flower stalk forming a head. Sprouting broccoli is more popular in India.
Variety
Green sprouting broccoli having green, firm and compact crown heads are more in demand in India. The important varieties are: KTS-I, Solan Green, Lucky, Fiesta, Pushpa, Aishwarya, PalamVichitra.
Soil and Climate
Broccoli can be grown in a wide variety of soils, but sandy and silt loam soils are most suited. It prefers well-drained upland soil for proper growth. The optimum pH range is 5.8-7.2.
It is a cool season crop and is sensitive to very low and high temperatures. The optimum temperature range of 10-25 "C is ideal for proper growth of the crop.
Field preparation
Same as in cauliflower
Seed rate
400-500g/ha
Sowing Time
In plain- Mid September to early November
In hills- September-October
Nursing Raising
Same as in cauliflower
Transplanting
The seedlings are ready for transplanting after 4-6 weeks of sowing. FYM @ 10-15 t/ha should be applied one month before transplanting. Nitrogen 120 kg, 80 kg phosphorus and 60 kg potash should be applied at the time of transplanting. Remaining half of nitrogen should be applied in two split doses at 30 and 45 days after transplanting. Transplanting should be done in the afternoon at a spacing of 45x30cm.

Irrigation
Light and frequent irrigation should be given at 10-15 days interval depending on
weather conditions.
Intercultural Operation
The crop should be kept weed free. Shallow hoeing should be done at 20-25 days after transplanting to remove weeds and loosen the soil for better aeration.
Plant protection measures
Cutworms: The caterpillars are 3 to 4 cm long, gray or brown to almost black with
various markings. They hide in daytime and feed at night. They cause damage by biting the foliage and by cutting down the young seedlings just above the ground level.
Control:
1. Picking and destruction of the larvae at the early stage of the crop.
2. Growing of paired rows of mustard after every 25 rows of the crop.
3. Spraying of the heavily infested crop with Rogoror Endosulfan@ 2 -3 ml/l of
water.
Leaf Webber: The leaves are skeletonised by the larvae, which remain on the under surface of leaves in webs and feed on them. They also attack flower buds and pods. The insect commonly sucks early grown crop.
Control:
1. Picking and destruction of the larvae at the early stage of the crop.
2. The crop should be sprayed with 3g solution.
Aphids: They feed on the plants affecting the quality. Mustard can act as a trap crop for aphids. Neemseed kernel extract can be sprayed at 4%.
Mustard saw fly: The larvae of mustard saw fly feed on leaves and it can be controlled by spraying.
Damping off: It is a serious disease in the nursery. In severe conditions, the affected
seedlings droop and fall off due to infection at the collar region. Seed treatment should be done at nusery.
Downy Mildew: This disease appears from nursery to curd formation stage. Fine Hair like downy growth of fungus is observed on the leaves. Corresponding to the downy fungal growth, minute pinhead brown necrotic spots appear on the upper surface of leaves. For controlling the disease, dense sowing of seeds in the nursery should be avoided.
White rust: It is a soil borne disease caused by fungus Sclerotiniascelorotiorum. The fungus attacks the bases of the outer leaves and plants suddenly wilt. For controlling this disease, the soil should be drenched with neem leaves extract with water. Deep ploughings should be done, as the fungus cannot survive below 15cm.
Black rot: First signs of the disease often appear along the margins of leaves as chlorotic regions and the chlorosis progresses in the direction of the mid rib forming a V-shaped area. Symptoms may appear from any side and centre of the leaves. The bacteria are transmitted through seeds.
Black leg: It occurs mostly in moist regions, especially in areas with high rainfall during the growth period. Proper seed treatment should be done.
Harvesting and yield
The crop is ready for harvesting after 80-90 days of transplanting. Heads having 10- 15 cm stems and green, compact bud clusters are harvested with a sharp knife. On an average, yield varies from 175-240 q/ha depending upon the variety.
Thursday 22 October 2020
Easy Pest Repellers for your garden
Here I am posting some important for all to keep pests away from your gardens. Make your own and use
1. Neem
Ancient Indians highly revered neem oil as a powerful, all-natural plant for warding off pests. In fact, neem juice is the most powerful natural pesticide on the planet, holding over 50 natural insecticides. This extremely bitter tree leaf can be made in a spray form, or can be bought from a number of reputable companies.
To make your own neem oil spray, simply add 1/2 an ounce of high quality organic neem oil and ½ teaspoon of a mild organic liquid soap (I use Dr. Bronners Peppermint) to two quarts of warm water. Stir slowly. Add to a spray bottle and use immediately.
2. Salt Spray
For treating plants infested with spider mites, mix 2 tablespoons of Himalayan Crystal Salt into one gallon of warm water and spray on infected areas.
3. Mineral oil
Mix 10-30 ml of high-grade oil with one liter of water. Stir and add to spray bottle. This organic pesticide works well for dehydrating insects and their eggs.
4. Citrus Oil and/or Cayenne Pepper Mix
This is another great organic pesticide that works well on ants. Simply, mix 10 drops of citrus essential oil with one teaspoon cayenne pepper and 1 cup of warm water. Shake well and spray in the affected areas.
5. Soap, Orange Citrus Oil & Water
To make this natural pesticide, simply mix 3 tablespoons of liquid Organic Castile soap with 1 ounce of Orange oil to one gallon of water. Shake well. This is an especially effective treatment against slugs and can be sprayed directly on ants and roaches.
6. Eucalyptus oil
A great natural pesticide for flies, bees and wasps. Simply sprinkle a few drops of eucalyptus oil where the insects are found. They will all be gone before you know it.
7. Onion and Garlic Spray
Mince one organic clove of garlic and one medium sized organic onion. Add to a quart of water. Wait one hour and then add one teaspoon of cayenne pepper and one tablespoon of liquid soap to the mix. This organic spray will hold its potency for one week if stored in the refrigerator.
8. Chrysanthemum Flower Tea
These flowers hold a powerful plant chemical component called pyrethrum. This substance invades the nervous system of insects rendering them immobile. You can make your own spray by boiling 100 grams of dried flowers into 1 liter of water. Boil dried flowers in water for twenty minutes. Strain, cool and place in a spray bottle. Can be stored for up to two months. You can also add some organic neem oil to enhance the effectiveness.
9. Tobacco Spray
Just as tobacco is not good for humans, tobacco spray was once a commonly used pesticide for killing pests, caterpillars and aphids. To make, simply take one cup of organic tobacco (preferably a brand that is organic and all-natural) and mix it in one gallon of water. Allow the mixture to set overnight. After 24-hours, the mix should have a light brown color. If it is very dark, add more water. This mix can be used on most plants, with the exception of those in the solanaceous family (tomatoes, peppers, eggplants, etc.)
10. Chile pepper / Diatomaceous Earth
Grind two handfuls of dry chiles into a fine powder and mix with 1 cup of Diatomaceous earth. Add to 2 liters of water and let set overnight. Shake well before applying.
If you have some easy recipes for making your own organic pesticides, we would love to hear them.


